Epson ES-300C User Manual - TWAIN - Page 36
Adjusting the Brightness, Adjusting the Magnification, 6 Using TWAIN
 |
View all Epson ES-300C manuals
Add to My Manuals
Save this manual to your list of manuals |
Page 36 highlights
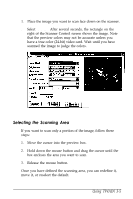
To define a new scanning area, move the cursor to the edge of the box until you see a double arrow; then hold the mouse button down while you drag the edge of the box to a different position. To reselect the default, click outside the selected scanning area but within the image. To move the scanning area, move the cursor to the center of the scanning area. The cursor becomes a hand icon. Hold the mouse button down and drag the box to a different position. When the image is what you want, you can then scan or select Preview again to see the new scan area. Adjusting the Brightness If the preview of your image appears too dark or too light, you can adjust the Brightness scroll bar on the Epson TWAIN Scanner Control screen to make your image lighter or darker. Brightness values range from -3 to +3. To lighten a dark original, use -1 to -3. To darken a light original, use +1 to +3. Adjusting the Magnification If you want to increase or decrease the size or scale of your image, you can use the Magnification scroll bar on the Epson TWAIN Scanner Control screen to select sizes from 50% to 200% of the original. The size you select is not reflected in the preview scan but is reflected in the final scan. Also, the size of the image on the monitor is only an approximation of the actual size of the image when printed. The Width and Height settings on the Scanner Control screen show the exact size of the image. 3-6 Using TWAIN
-
 1
1 -
2
-
3
-
4
-
5
-
6
-
7
-
8
-
9
-
10
-
11
-
12
-
13
-
14
-
15
-
16
-
17
-
18
-
19
-
20
-
21
-
22
-
23
-
24
-
25
-
26
-
27
-
28
-
29
-
30
-
 31
31 -
 32
32 -
 33
33 -
 34
34 -
 35
35 -
 36
36 -
 37
37 -
 38
38 -
 39
39 -
 40
40 -
 41
41 -
42
-
43
-
44
-
45
-
46
-
47
-
48
-
49
-
50
-
51
-
52
-
53
-
54
-
55
-
56
-
57
-
58
-
59
-
60
-
61
 |
 |