Epson MX-82 F/T User Manual - Page 84
MAINTENANCE, Preventive Maintenance, Parts Replacement, NOTE: Be, NOTES
 |
View all Epson MX-82 F/T manuals
Add to My Manuals
Save this manual to your list of manuals |
Page 84 highlights
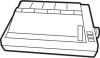
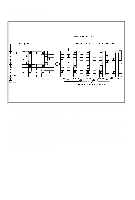
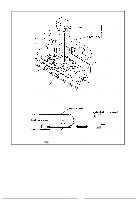
MAINTENANCE 1. Preventive Maintenance Preventive maintenance for the MX-82 and MX-82 F/T consist basically of cleaning. The Printer should be cleaned with a soft brush to remove paper dust and particles after every three months of use. The exterior surface of the Printer can be cleaned by using a mild detergent and water solution. 2. Parts Replacement (1) General Owing to the sophisticated nature of the circuitry and mechanisms utilized in the MX-82, MX-82 F/T, operator's troubleshooting is logically obliged to be limited to certain easily recognizable symptoms and cures. If a Printer malfunction other than the print head unit should occur, the operator should contact the store from which the printer was purchased. (2) Print head In case of a print head trouble or a worn dot wire, replace the print head unit as described below. (See Fig. 69) NOTE: Be sure to replace the print head after it has cooled. STEP 1. Turn the power off. 2. Take off the printer lid and cartridge ribbon. 3. Turn the head lock lever clockwise and remove the print head. 4. Pull the head cable out straight while steadying the head connector on the terminal board. 5. Put a new head on the carriage assembly and replace the head lock lever. 6. Insert the head cable into the head connector carefully. NOTES: 1. Inadequate connection may cause malfunctioning of the head. 2. The carriage assembly should not be moved without the print head mounted on the carriage.
-
 1
1 -
2
-
3
-
4
-
5
-
6
-
7
-
8
-
9
-
10
-
11
-
12
-
13
-
14
-
15
-
16
-
17
-
18
-
19
-
20
-
21
-
22
-
23
-
24
-
25
-
26
-
27
-
28
-
29
-
30
-
31
-
32
-
33
-
34
-
35
-
36
-
37
-
38
-
39
-
40
-
41
-
42
-
43
-
44
-
45
-
46
-
47
-
48
-
49
-
50
-
51
-
52
-
53
-
54
-
55
-
56
-
57
-
58
-
59
-
60
-
61
-
62
-
63
-
64
-
65
-
66
-
67
-
68
-
69
-
70
-
71
-
72
-
73
-
74
-
75
-
76
-
77
-
78
-
 79
79 -
 80
80 -
 81
81 -
 82
82 -
 83
83 -
 84
84 -
 85
85 -
 86
86 -
 87
87 -
 88
88 -
 89
89 -
90
-
91
-
92
-
93
-
94
-
95
-
96
-
97
-
98
-
99
-
100
-
101
-
102
-
103
 |
 |