Epson Perfection 1200U User Manual - TWAIN - Page 21
Using Marquees, Basic Scanning,
 |
View all Epson Perfection 1200U manuals
Add to My Manuals
Save this manual to your list of manuals |
Page 21 highlights
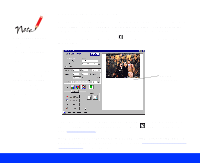
If the mouse pointer doesn't change to a cross hair, click the Preview button again. Using Marquees A marquee is a frame around an entire image, or a portion of an image so you can scan only the most important part. To create a marquee, follow these steps: 1 Move the mouse pointer over the preview image; the pointer becomes a cross hair. 2 Position the pointer in the corner of the area you want to select and press the mouse button. 3 Hold down the mouse button as you drag the mouse across the image, creating a marquee. You can save different sets of settings for your marquee and then batch scan all the variations. See Batch Scanning for details. marquee 4 Release the button when the marquee contains the image area you want. 5 To enlarge the preview of the new image area, click the Zoom Preview button. If you need to adjust the marquee size or position, or delete the marquee, see Adjusting a Marquee. Basic Scanning Page 21
-
 1
1 -
2
-
3
-
4
-
5
-
6
-
7
-
8
-
9
-
10
-
11
-
12
-
13
-
14
-
15
-
 16
16 -
 17
17 -
 18
18 -
 19
19 -
 20
20 -
 21
21 -
 22
22 -
 23
23 -
 24
24 -
 25
25 -
 26
26 -
27
-
28
-
29
-
30
-
31
-
32
-
33
-
34
-
35
-
36
-
37
-
38
-
39
-
40
-
41
-
42
-
43
-
44
-
45
-
46
-
47
-
48
-
49
-
50
-
51
-
52
-
53
-
54
-
55
-
56
-
57
-
58
-
59
-
60
-
61
-
62
-
63
-
64
-
65
-
66
-
67
-
68
-
69
-
70
-
71
-
72
-
73
-
74
-
75
-
76
-
77
-
78
-
79
-
80
-
81
-
82
-
83
-
84
-
85
-
86
-
87
-
88
-
89
-
90
-
91
-
92
-
93
-
94
-
95
-
96
-
97
-
98
-
99
-
100
-
101
-
102
-
103
 |
 |
