Epson Perfection 1200U User Manual - TWAIN - Page 38
Adjusting Source and Target Image Sizes, Selecting, Basic Settings
 |
View all Epson Perfection 1200U manuals
Add to My Manuals
Save this manual to your list of manuals |
Page 38 highlights
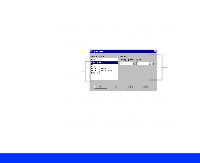
Sometimes the values you select may be rounded up or down to retain the proportions of your image or marquee. The width and height settings are ignored if you scan without first previewing the image. If you enlarge your target image size by scaling or selecting a larger Target size, be sure to increase the Resolution setting by the same proportion to retain your image quality. See Selecting Basic Settings for instructions on changing the Resolution setting. Adjusting Source and Target Image Sizes The Source width and height fields indicate the size of the entire preview image or of the marquee. You can type in a new width and height to specify exactly how much of the image you want to scan. measurement units To change the unit of measurement used for the Source and Target width and height fields, select inches, pixels, or cm (centimeters) from the measurement units list. The Target width and height fields indicate the size of your scanned image using the current settings. The values in these fields change as you modify settings. You can also type in a specific width and height to specify the target image size exactly. lock icon file size To retain the Target width and height no matter how you size the source image, click the lock icon. Click it again to unlock the values. The file size indicator shows the approximate size of the scanned image in KB or MB, based on the image's size and selected resolution. Advanced Scanning Page 38
-
 1
1 -
2
-
3
-
4
-
5
-
6
-
7
-
8
-
9
-
10
-
11
-
12
-
13
-
14
-
15
-
16
-
17
-
18
-
19
-
20
-
21
-
22
-
23
-
24
-
25
-
26
-
27
-
28
-
29
-
30
-
31
-
32
-
 33
33 -
 34
34 -
 35
35 -
 36
36 -
 37
37 -
 38
38 -
 39
39 -
 40
40 -
 41
41 -
 42
42 -
 43
43 -
44
-
45
-
46
-
47
-
48
-
49
-
50
-
51
-
52
-
53
-
54
-
55
-
56
-
57
-
58
-
59
-
60
-
61
-
62
-
63
-
64
-
65
-
66
-
67
-
68
-
69
-
70
-
71
-
72
-
73
-
74
-
75
-
76
-
77
-
78
-
79
-
80
-
81
-
82
-
83
-
84
-
85
-
86
-
87
-
88
-
89
-
90
-
91
-
92
-
93
-
94
-
95
-
96
-
97
-
98
-
99
-
100
-
101
-
102
-
103
 |
 |
