Epson PowerLite 78 User's Guide - Page 71
Choosing When to Display the Image, Enter, Select this image?, Save this image as the User's Logo?
 |
View all Epson PowerLite 78 manuals
Add to My Manuals
Save this manual to your list of manuals |
Page 71 highlights
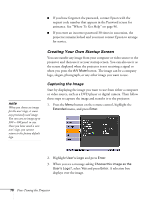
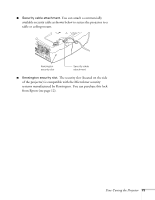
4. Use the arrow buttons to select the area of the image you want to use. Then press Enter. 5. When you see the message Select this image?, highlight Yes and press Enter. 6. Use the arrow buttons to select a zoom factor (display size) and press Enter. 7. When the message Save this image as the User's Logo? appears, select Yes and press Enter. Saving the logo may take a few moments. Do not use your projector, remote control, or video source while the logo is being saved. 8. When you see the message Completed, press Menu to exit. Choosing When to Display the Image After your image is saved, you can set it to display as the startup screen, the screen you see when there's no signal, or the screen you see when you press the A/V Mute button (see page 50). 1. Press the Menu button, highlight the Extended menu, and press Enter. 2. Select Display and press Enter. 3. Choose from these display options: ■ Set Display Background to Logo to display your image when there is no signal. ■ Set Startup Screen to On to display your image when the projector is warming up. ■ Set A/V Mute to Logo to display your image when you press the A/V Mute button. 4. When you're finished, press Menu to exit. note You can lock these settings to prevent them from being changed without a password (see page 68). Fine-Tuning the Projector 71
-
 1
1 -
2
-
3
-
4
-
5
-
6
-
7
-
8
-
9
-
10
-
11
-
12
-
13
-
14
-
15
-
16
-
17
-
18
-
19
-
20
-
21
-
22
-
23
-
24
-
25
-
26
-
27
-
28
-
29
-
30
-
31
-
32
-
33
-
34
-
35
-
36
-
37
-
38
-
39
-
40
-
41
-
42
-
43
-
44
-
45
-
46
-
47
-
48
-
49
-
50
-
51
-
52
-
53
-
54
-
55
-
56
-
57
-
58
-
59
-
60
-
61
-
62
-
63
-
64
-
65
-
 66
66 -
 67
67 -
 68
68 -
 69
69 -
 70
70 -
 71
71 -
 72
72 -
 73
73 -
 74
74 -
 75
75 -
 76
76 -
77
-
78
-
79
-
80
-
81
-
82
-
83
-
84
-
85
-
86
-
87
-
88
-
89
-
90
-
91
-
92
-
93
-
94
-
95
-
96
-
97
-
98
-
99
-
100
-
101
-
102
-
103
-
104
-
105
-
106
-
107
-
108
-
109
-
110
-
111
-
112
-
113
-
114
-
115
-
116
-
117
-
118
 |
 |
