Epson PowerLite 81p User Manual - Page 32
Selecting the Image Source, to appear, see What To Do If You See a Blank Screen
 |
View all Epson PowerLite 81p manuals
Add to My Manuals
Save this manual to your list of manuals |
Page 32 highlights
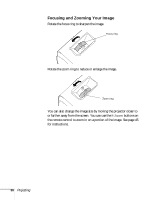
To focus and adjust the image, see page 35. If a projected image fails to appear, see "What To Do If You See a Blank Screen" on page 33. When you're done with your presentation, shut down the projector as described on page 41. Shutting down the projector correctly prevents premature lamp failure and possible damage from overheating. note The name of the selected image source appears in the upper right corner of the screen. Selecting the Image Source Selecting the image source lets you switch between images input from different pieces of equipment connected to the projector (such as a computer and DVD player). If you don't see the image you want, press one of the following buttons on the remote control: ■ Comp 1 Press this button to move through the following options: Computer 1 (Auto), Computer 1 (RGB), and Computer 1 (Component Video). ■ Comp 2 Press this button to move through the following options: Computer 2 (Auto), Computer 2 (RGB), Computer 2 (Component Video). ■ S-Video Press to select S-Video. ■ Video Press to select Video. You can also press the Source Search button on the remote control or projector until the correct device image is projected. If a projected image fails to appear, see the next section for help. Once you see your image, turn to page 35 for instructions on focusing and making other image adjustments. 32 Projecting
-
 1
1 -
2
-
3
-
4
-
5
-
6
-
7
-
8
-
9
-
10
-
11
-
12
-
13
-
14
-
15
-
16
-
17
-
18
-
19
-
20
-
21
-
22
-
23
-
24
-
25
-
26
-
 27
27 -
 28
28 -
 29
29 -
 30
30 -
 31
31 -
 32
32 -
 33
33 -
 34
34 -
 35
35 -
 36
36 -
 37
37 -
38
-
39
-
40
-
41
-
42
-
43
-
44
-
45
-
46
-
47
-
48
-
49
-
50
-
51
-
52
-
53
-
54
-
55
-
56
-
57
-
58
-
59
-
60
-
61
-
62
-
63
-
64
-
65
-
66
-
67
-
68
-
69
-
70
-
71
-
72
-
73
-
74
-
75
-
76
-
77
-
78
-
79
-
80
-
81
-
82
-
83
-
84
-
85
-
86
-
87
-
88
-
89
-
90
-
91
-
92
-
93
-
94
-
95
-
96
-
97
-
98
-
99
-
100
-
101
-
102
-
103
-
104
-
105
-
106
-
107
-
108
-
109
-
110
-
111
-
112
-
113
-
114
-
115
-
116
 |
 |
