Epson PowerLite 81p User Manual - Page 38
Adjusting the Image Shape, pointer button on the remote
 |
View all Epson PowerLite 81p manuals
Add to My Manuals
Save this manual to your list of manuals |
Page 38 highlights
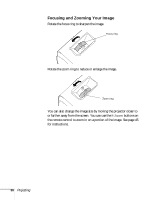
Pointer button Enter button Menu buttton note You can also use the buttons on the projector to access the menu system: Menu button ESC button Adjusting the Image Shape The projector automatically corrects images that are distorted when the projector is tilted up or down (up to a 15° tilt). The Keystone window appears on the screen while the projector makes the correction. If the projected image still isn't rectangular or has a "keystone" shape, do one or more of the following: ■ If your image looks like or , you've placed the projector off to one side of the screen, at an angle. Move it directly in front of the center of the screen, facing the screen squarely. ■ If your image looks like or , the Auto Keystone feature may have been disabled or you may need to manually adjust the keystone correction value. (Auto Keystone is not available when you're using ceiling or rear projection.) Follow the directions below: ■ To turn on Auto Keystone, press the Menu button on the remote control. Use the pointer button on the remote control (or the arrow buttons on the projector) to select the Setting menu, then press Enter. If Auto Keystone is OFF, use the pointer button to highlight this option and press Enter. Select ON in the Auto Keystone window that appears and press Enter to save your changes. Exit the menu by pressing the Menu button. ■ To manually adjust the keystone correction value, press the or buttons on the projector to correct the shape of the image. After correction, your image will be slightly smaller. Enter button Arrow buttons 38 Projecting
-
 1
1 -
2
-
3
-
4
-
5
-
6
-
7
-
8
-
9
-
10
-
11
-
12
-
13
-
14
-
15
-
16
-
17
-
18
-
19
-
20
-
21
-
22
-
23
-
24
-
25
-
26
-
27
-
28
-
29
-
30
-
31
-
32
-
 33
33 -
 34
34 -
 35
35 -
 36
36 -
 37
37 -
 38
38 -
 39
39 -
 40
40 -
 41
41 -
 42
42 -
 43
43 -
44
-
45
-
46
-
47
-
48
-
49
-
50
-
51
-
52
-
53
-
54
-
55
-
56
-
57
-
58
-
59
-
60
-
61
-
62
-
63
-
64
-
65
-
66
-
67
-
68
-
69
-
70
-
71
-
72
-
73
-
74
-
75
-
76
-
77
-
78
-
79
-
80
-
81
-
82
-
83
-
84
-
85
-
86
-
87
-
88
-
89
-
90
-
91
-
92
-
93
-
94
-
95
-
96
-
97
-
98
-
99
-
100
-
101
-
102
-
103
-
104
-
105
-
106
-
107
-
108
-
109
-
110
-
111
-
112
-
113
-
114
-
115
-
116
 |
 |
