Epson PowerLite Pro Cinema LS10000 User Manual - Page 49
Direct Power On, Warning, Source, Parent topic, Related references, Using Basic Projector Features
 |
View all Epson PowerLite Pro Cinema LS10000 manuals
Add to My Manuals
Save this manual to your list of manuals |
Page 49 highlights
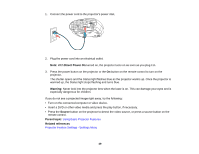
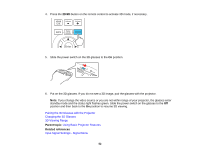
1. Connect the power cord to the projector's power inlet. 2. Plug the power cord into an electrical outlet. Note: With Direct Power On turned on, the projector turns on as soon as you plug it in. 3. Press the power button on the projector or the On button on the remote control to turn on the projector. The shutter opens and the Status light flashes blue as the projector warms up. Once the projector is warmed up, the Status light stops flashing and turns blue. Warning: Never look into the projector lens when the laser is on. This can damage your eyes and is especially dangerous for children. If you do not see a projected image right away, try the following: • Turn on the connected computer or video device. • Insert a DVD or other video media and press the play button, if necessary. • Press the Source button on the projector to detect the video source, or press a source button on the remote control. Parent topic: Using Basic Projector Features Related references Projector Feature Settings - Settings Menu 49
-
 1
1 -
2
-
3
-
4
-
5
-
6
-
7
-
8
-
9
-
10
-
11
-
12
-
13
-
14
-
15
-
16
-
17
-
18
-
19
-
20
-
21
-
22
-
23
-
24
-
25
-
26
-
27
-
28
-
29
-
30
-
31
-
32
-
33
-
34
-
35
-
36
-
37
-
38
-
39
-
40
-
41
-
42
-
43
-
 44
44 -
 45
45 -
 46
46 -
 47
47 -
 48
48 -
 49
49 -
 50
50 -
 51
51 -
 52
52 -
 53
53 -
 54
54 -
55
-
56
-
57
-
58
-
59
-
60
-
61
-
62
-
63
-
64
-
65
-
66
-
67
-
68
-
69
-
70
-
71
-
72
-
73
-
74
-
75
-
76
-
77
-
78
-
79
-
80
-
81
-
82
-
83
-
84
-
85
-
86
-
87
-
88
-
89
-
90
-
91
-
92
-
93
-
94
-
95
-
96
-
97
-
98
-
99
-
100
-
101
-
102
-
103
-
104
-
105
-
106
-
107
-
108
-
109
-
110
-
111
-
112
-
113
-
114
-
115
-
116
-
117
-
118
-
119
-
120
-
121
-
122
-
123
-
124
-
125
-
126
-
127
-
128
-
129
-
130
-
131
-
132
-
133
-
134
-
135
-
136
-
137
-
138
-
139
-
140
-
141
-
142
-
143
-
144
-
145
-
146
-
147
-
148
-
149
-
150
-
151
-
152
-
153
-
154
-
155
-
156
-
157
-
158
-
159
-
160
-
161
-
162
-
163
-
164
-
165
-
166
-
167
-
168
-
169
-
170
-
171
-
172
-
173
-
174
-
175
-
176
-
177
-
178
-
179
-
180
-
181
-
182
-
183
-
184
-
185
-
186
-
187
-
188
-
189
-
190
-
191
-
192
-
193
-
194
-
195
-
196
-
197
-
198
-
199
-
200
-
201
-
202
-
203
-
204
 |
 |
