Epson PowerLite Pro Cinema LS10000 User Manual - Page 75
Changing the Super-resolution Setting, Image, Enter, Lens Iris, Parent topic, Super-resolution
 |
View all Epson PowerLite Pro Cinema LS10000 manuals
Add to My Manuals
Save this manual to your list of manuals |
Page 75 highlights
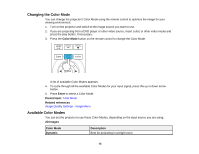
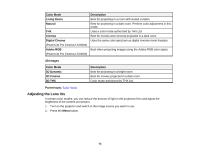
3. Select the Image menu and press Enter. 4. Select the Lens Iris setting and press and hold the left or right arrow buttons on the projector's remote control to adjust the lens iris. Note: Reducing the value increases the intensity of the colors in the image. The default values and settings differ based on the Color Mode settings and the zoom lens position. 5. Press Menu or Esc to exit the menus. Parent topic: Color Mode Changing the Super-resolution Setting You can sharpen blurred images and enhance the apparent detail of an image by increasing the resolution of the image signal using the Super-resolution setting. (PowerLite Pro Cinema LS9600e). Note: You cannot use Super-resolution when converting 2D images to 3D images, or when a computer image is displayed. When projecting 3D images, you can use this setting only with 1080p/24 Hz/frame packing signals. 1. Turn on the projector and switch to the image source you want to use. 75
-
 1
1 -
2
-
3
-
4
-
5
-
6
-
7
-
8
-
9
-
10
-
11
-
12
-
13
-
14
-
15
-
16
-
17
-
18
-
19
-
20
-
21
-
22
-
23
-
24
-
25
-
26
-
27
-
28
-
29
-
30
-
31
-
32
-
33
-
34
-
35
-
36
-
37
-
38
-
39
-
40
-
41
-
42
-
43
-
44
-
45
-
46
-
47
-
48
-
49
-
50
-
51
-
52
-
53
-
54
-
55
-
56
-
57
-
58
-
59
-
60
-
61
-
62
-
63
-
64
-
65
-
66
-
67
-
68
-
69
-
 70
70 -
 71
71 -
 72
72 -
 73
73 -
 74
74 -
 75
75 -
 76
76 -
 77
77 -
 78
78 -
 79
79 -
 80
80 -
81
-
82
-
83
-
84
-
85
-
86
-
87
-
88
-
89
-
90
-
91
-
92
-
93
-
94
-
95
-
96
-
97
-
98
-
99
-
100
-
101
-
102
-
103
-
104
-
105
-
106
-
107
-
108
-
109
-
110
-
111
-
112
-
113
-
114
-
115
-
116
-
117
-
118
-
119
-
120
-
121
-
122
-
123
-
124
-
125
-
126
-
127
-
128
-
129
-
130
-
131
-
132
-
133
-
134
-
135
-
136
-
137
-
138
-
139
-
140
-
141
-
142
-
143
-
144
-
145
-
146
-
147
-
148
-
149
-
150
-
151
-
152
-
153
-
154
-
155
-
156
-
157
-
158
-
159
-
160
-
161
-
162
-
163
-
164
-
165
-
166
-
167
-
168
-
169
-
170
-
171
-
172
-
173
-
174
-
175
-
176
-
177
-
178
-
179
-
180
-
181
-
182
-
183
-
184
-
185
-
186
-
187
-
188
-
189
-
190
-
191
-
192
-
193
-
194
-
195
-
196
-
197
-
198
-
199
-
200
-
201
-
202
-
203
-
204
 |
 |
