Epson Stylus 800 User Manual - Page 27
Connecting the Printer Your Computer, PAUSE, LOAD/EJECT, Printer
 |
View all Epson Stylus 800 manuals
Add to My Manuals
Save this manual to your list of manuals |
Page 27 highlights
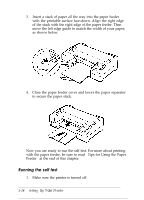
2. While holding down the FONT button, turn on the printer. (Hold down the button until the printer starts working; it takes a few seconds,) It loads a sheet of paper automatically from the paper feeder and begins the self test. The printer prints characters in each font, in the order the fonts appear on the control panel. Here is part of a typical self test: Courier !"#$%&I()*+,-./0123456789:; ?@ABCDEFGHIJKLMNOPQR 0123456789:; '?@ABCDEFGHIJKLMNOPQRS 0123456789:; ?@ABCDEFGHIJKLMNOPQRSTl #$%&I()*+,-./0123456789:; ?@ABCDEFGHIJKLMNOPQRSTU $%&'()*t,-./0123456789:; ?@ABCDEFGHIJKLMNOPQRSTUVl %a'()*+,-. /0123456789:; ?@ABCDEFGHIJKLMNOPQRSTUVW: &';;ln*T+,-./0123456789., .*?@ABCDEFGHIJKLMNOPQRSTUVNX '()*+,-./0123456789:;?@ABCDEFGHIJKLMNOPQRSTUVWXYZn]"_'abcdefghij ()*+,-./0123456789:;?@ABCDEFGHIJKLMNOPQRSTUVWXYZn]*_'abcdefghij )*+,-./0123456789:;?@ABCDEFGHIJKLMNOPQRSTUVWXYZn]*_'abcdefghij~ 3. The self test continues until the paper in the paper feeder runs out or you press the PAUSE button. To stop the test, press the PAUSE button. To resume the test, press the PAUSE button again. 4. To end the self test, press the PAUSE button to stop printing and then press the LOAD/EJECT button to eject the paper. 5. Turn off the printer. Connecting the Printer to Your Computer If the self test prints correctly, you are ready to connect your printer to the computer. You need a shielded twisted-pair parallel cable to connect your computer to the printer's built-in parallel interface. Setting Up Your Printer 1-15
-
 1
1 -
2
-
3
-
4
-
5
-
6
-
7
-
8
-
9
-
10
-
11
-
12
-
13
-
14
-
15
-
16
-
17
-
18
-
19
-
20
-
21
-
 22
22 -
 23
23 -
 24
24 -
 25
25 -
 26
26 -
 27
27 -
 28
28 -
 29
29 -
 30
30 -
 31
31 -
 32
32 -
33
-
34
-
35
-
36
-
37
-
38
-
39
-
40
-
41
-
42
-
43
-
44
-
45
-
46
-
47
-
48
-
49
-
50
-
51
-
52
-
53
-
54
-
55
-
56
-
57
-
58
-
59
-
60
-
61
-
62
-
63
-
64
-
65
-
66
-
67
-
68
-
69
-
70
-
71
-
72
-
73
-
74
-
75
-
76
-
77
-
78
-
79
-
80
-
81
-
82
-
83
-
84
-
85
-
86
-
87
-
88
-
89
-
90
-
91
-
92
-
93
-
94
-
95
-
96
-
97
 |
 |
