Garmin eTrex Legend CX Owner's Manual - Page 15
Initializing the GPS Receiver, To initialize your eTrex
 |
UPC - 753759049140
View all Garmin eTrex Legend CX manuals
Add to My Manuals
Save this manual to your list of manuals |
Page 15 highlights
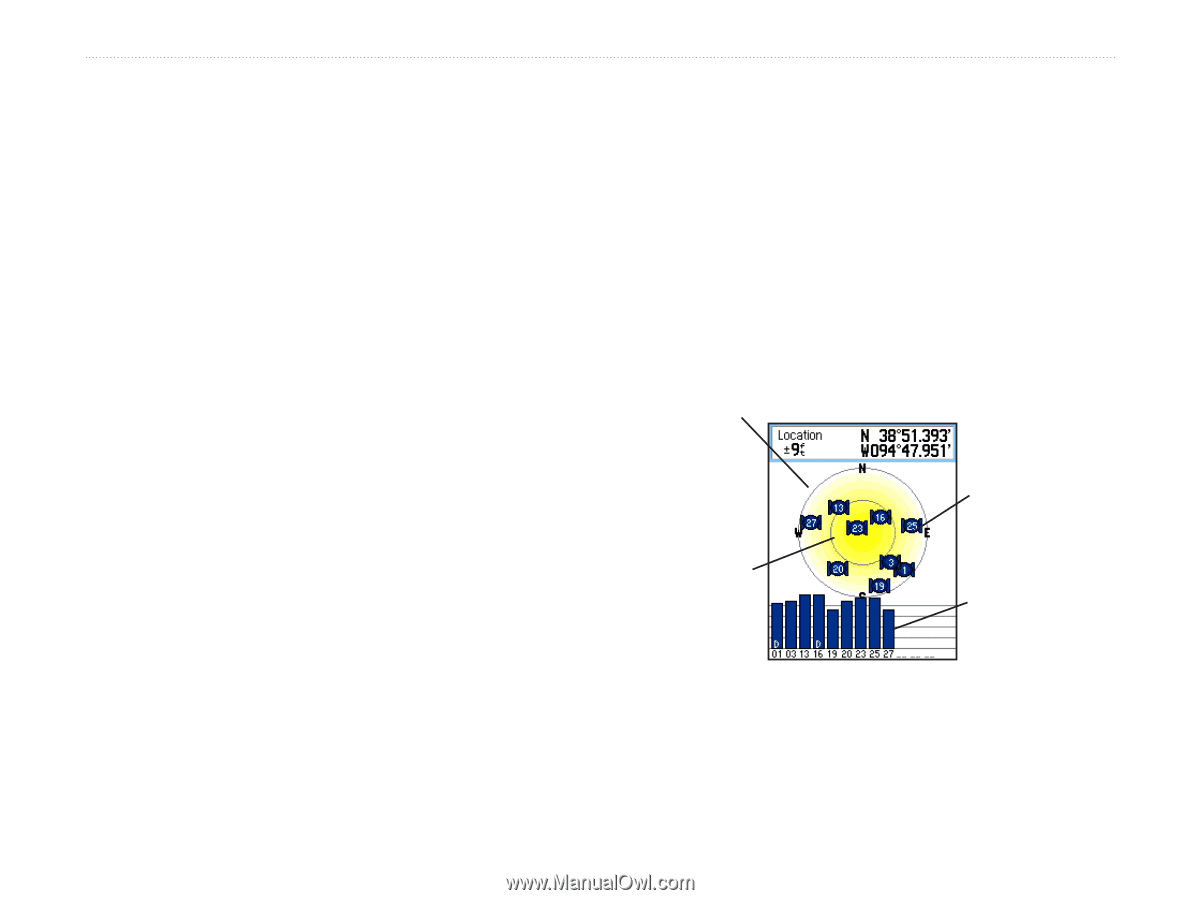
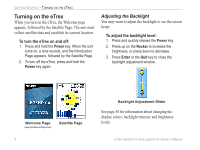
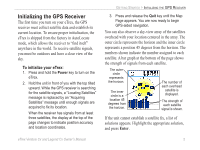
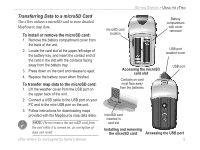
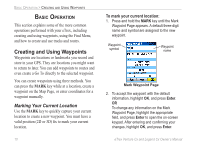
Initializing the GPS Receiver The first time you turn on your eTrex, the GPS receiver must collect satellite data and establish its current location. To ensure proper initialization, the eTrex is shipped from the factory in AutoLocate mode, which allows the receiver to "find itself" anywhere in the world. To receive satellite signals, you must be outdoors and have a clear view of the sky. To initialize your eTrex: 1. Press and hold the Power key to turn on the eTrex. 2. Hold the unit in front of you with the top tilted upward. While the GPS receiver is searching for the satellite signals, a "Locating Satellites" message is replaced by an "Acquiring Satellites" message until enough signals are acquired to fix its location. When the receiver has signals from at least three satellites, the display at the top of the page changes to indicate position accuracy and location coordinates. eTrex Venture Cx and Legend Cx Owner's Manual GETTING STARTED > INITIALIZING THE GPS RECEIVER 3. Press and release the Quit key until the Map Page appears. You are now ready to begin GPS-aided navigation. You can also observe a sky-view array of the satellites overhead with your location centered in the array. The outer circle represents the horizon and the inner circle represents a position 45 degrees from the horizon. The numbers shown indicate the number assigned to each satellite. A bar graph at the bottom of the page shows the strength of signals from each satellite. The outer circle represents the horizon. The inner circle is a location 45 degrees from the horizon. The number of each overhead satellite is displayed. The strength of each satellite signal is shown. If the unit cannot establish a satellite fix, a list of solutions appears. Highlight the appropriate solution, and press Enter. 5
-
 1
1 -
2
-
3
-
4
-
5
-
6
-
7
-
8
-
9
-
 10
10 -
 11
11 -
 12
12 -
 13
13 -
 14
14 -
 15
15 -
 16
16 -
 17
17 -
 18
18 -
 19
19 -
 20
20 -
21
-
22
-
23
-
24
-
25
-
26
-
27
-
28
-
29
-
30
-
31
-
32
-
33
-
34
-
35
-
36
-
37
-
38
-
39
-
40
-
41
-
42
-
43
-
44
-
45
-
46
-
47
-
48
-
49
-
50
-
51
-
52
-
53
-
54
-
55
-
56
-
57
-
58
-
59
-
60
-
61
-
62
-
63
-
64
-
65
-
66
-
67
-
68
-
69
-
70
-
71
-
72
-
73
-
74
-
75
-
76
-
77
-
78
-
79
-
80
-
81
-
82
-
83
-
84
-
85
-
86
-
87
-
88
-
89
-
90
-
91
-
92
-
93
-
94
-
95
-
96
 |
 |