Garmin eTrex Legend CX Owner's Manual - Page 68
Interface Setup, Display Mode, Night, Daytime Color Scheme and Nightime Color, Scheme
 |
UPC - 753759049140
View all Garmin eTrex Legend CX manuals
Add to My Manuals
Save this manual to your list of manuals |
Page 68 highlights
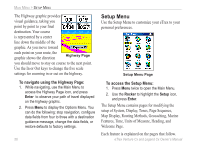
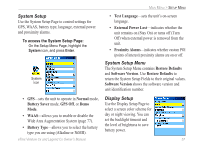
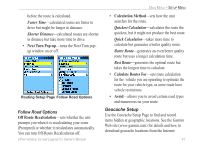
MAIN MENU > SETUP MENU To access the Display Setup Page: On the Setup Menu Page, highlight the Display icon, and press Enter. • Display Mode-sets the display to Day, Night, or Auto mode. Select Auto to automatically switch from day to night at sunset and change back at sunrise. • Daytime Color Scheme and Nightime Color Scheme-select the color scheme to use when operating in Day or Night mode. • Backlight Timeout-sets the backlight to stay on when it is turned on, or to time out after a selected period of time has elapsed when using the battery. The backlight stays on regardless of this setting when external power is used. • Backlight Level-turns the backlight up or down. Press up on the Rocker to increase the intensity or down to decrease. Interface Setup Use the Interface Setup Page to transfer data to or from the microSD card contained in your unit. To access the Interface Setup Page: On the Setup Menu Page, highlight the Interface icon, and press ENTER to display the page. If the USB cable is connected to a PC and the unit, a "Connected" message appears on the page. USB Mass Storage- the microSD card can be used as a USB Mass Storage device for transfer of Track Log Data and detailed map data transfer. 1. Connect the unit to a computer using the USB cable. 2. Highlight the on-screen USB Mass Storage button and press ENTER. 3. Observe an illustration of the eTrex Cx connected to a computer and an Unplug or Eject icon shown on a PC's system tray or a storage device icon for the microSD card on a Macintosh®. 58 eTrex Venture Cx and Legend Cx Owner's Manual
-
 1
1 -
2
-
3
-
4
-
5
-
6
-
7
-
8
-
9
-
10
-
11
-
12
-
13
-
14
-
15
-
16
-
17
-
18
-
19
-
20
-
21
-
22
-
23
-
24
-
25
-
26
-
27
-
28
-
29
-
30
-
31
-
32
-
33
-
34
-
35
-
36
-
37
-
38
-
39
-
40
-
41
-
42
-
43
-
44
-
45
-
46
-
47
-
48
-
49
-
50
-
51
-
52
-
53
-
54
-
55
-
56
-
57
-
58
-
59
-
60
-
61
-
62
-
 63
63 -
 64
64 -
 65
65 -
 66
66 -
 67
67 -
 68
68 -
 69
69 -
 70
70 -
 71
71 -
 72
72 -
 73
73 -
74
-
75
-
76
-
77
-
78
-
79
-
80
-
81
-
82
-
83
-
84
-
85
-
86
-
87
-
88
-
89
-
90
-
91
-
92
-
93
-
94
-
95
-
96
 |
 |
