Garmin eTrex Legend CX Owner's Manual - Page 41
Creating and Using Routes, Creating a Route
 |
UPC - 753759049140
View all Garmin eTrex Legend CX manuals
Add to My Manuals
Save this manual to your list of manuals |
Page 41 highlights
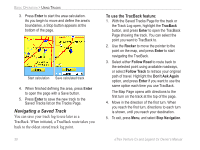
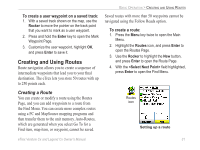
BASIC OPERATION > CREATING AND USING ROUTES To create a user waypoint on a saved track: 1. With a saved track shown on the map, use the Rocker to move the pointer on the track point that you want to mark as a user waypoint. 2. Press and hold the Enter key to open the Mark Waypoint Page. 3. Customize the user waypoint, highlight OK, and press Enter to save it. Creating and Using Routes Route navigation allows you to create a sequence of intermediate waypoints that lead you to your final destination. The eTrex lets you store 50 routes with up to 250 points each. Saved routes with more than 50 waypoints cannot be navigated using the Follow Roads option. To create a route: 1. Press the Menu key twice to open the Main Menu. 2. Highlight the Routes icon, and press Enter to open the Routes Page. 3. Use the Rocker to highlight the New button, and press Enter to open the Route Page. 4. With the field highlighted, press Enter to open the Find Menu. Creating a Route You can create or modify a route using the Routes Page, and you can add waypoints to a route from the Find Menu. You can create more complex routes using a PC and MapSource mapping programs and then transfer them to the unit memory. Auto-Routes, which are generated when you select Go To for a Find item, map item, or waypoint, cannot be saved. Routes icon Setting up a route eTrex Venture Cx and Legend Cx Owner's Manual 31
-
 1
1 -
2
-
3
-
4
-
5
-
6
-
7
-
8
-
9
-
10
-
11
-
12
-
13
-
14
-
15
-
16
-
17
-
18
-
19
-
20
-
21
-
22
-
23
-
24
-
25
-
26
-
27
-
28
-
29
-
30
-
31
-
32
-
33
-
34
-
35
-
 36
36 -
 37
37 -
 38
38 -
 39
39 -
 40
40 -
 41
41 -
 42
42 -
 43
43 -
 44
44 -
 45
45 -
 46
46 -
47
-
48
-
49
-
50
-
51
-
52
-
53
-
54
-
55
-
56
-
57
-
58
-
59
-
60
-
61
-
62
-
63
-
64
-
65
-
66
-
67
-
68
-
69
-
70
-
71
-
72
-
73
-
74
-
75
-
76
-
77
-
78
-
79
-
80
-
81
-
82
-
83
-
84
-
85
-
86
-
87
-
88
-
89
-
90
-
91
-
92
-
93
-
94
-
95
-
96
 |
 |
