Garmin eTrex Legend CX Owner's Manual - Page 21
Creating Waypoints Using the Map, Creating a Waypoint Using Coordinates - user manual
 |
UPC - 753759049140
View all Garmin eTrex Legend CX manuals
Add to My Manuals
Save this manual to your list of manuals |
Page 21 highlights
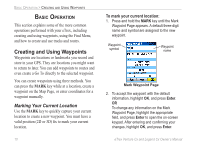
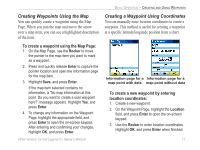
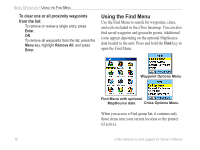
Creating Waypoints Using the Map You can quickly create a waypoint using the Map Page. When you pan the map and move the arrow over a map item, you can see a highlighted description of the item. To create a waypoint using the Map Page: 1. On the Map Page, use the Rocker to move the pointer to the map item you want to mark as a waypoint. 2. Press and quickly release Enter to capture the pointer location and open the information page for the map item. 3. Highlight Save, and press Enter. If the map item selected contains no information, a "No map information at this point. Do you want to create a user waypoint here?" message appears. Highlight Yes, and press Enter. 4. To change any information on the Waypoint Page, highlight the appropriate field, and press Enter to open the on-screen keypad. After entering and confirming your changes, highlight OK, and press Enter. eTrex Venture Cx and Legend Cx Owner's Manual BASIC OPERATION > CREATING AND USING WAYPOINTS Creating a Waypoint Using Coordinates You can manually enter location coordinates to create a waypoint. This method is useful for creating a waypoint at a specific latitude/longitude position from a chart. Information page for a Information page for a map point with data map point without data To create a new waypoint by entering location coordinates: 1. Create a new waypoint. 2. On the Waypoint Page, highlight the Location field, and press Enter to open the on-screen keypad. 3. Use the Rocker to enter location coordinates. Highlight OK, and press Enter when finished. 11
-
 1
1 -
2
-
3
-
4
-
5
-
6
-
7
-
8
-
9
-
10
-
11
-
12
-
13
-
14
-
15
-
 16
16 -
 17
17 -
 18
18 -
 19
19 -
 20
20 -
 21
21 -
 22
22 -
 23
23 -
 24
24 -
 25
25 -
 26
26 -
27
-
28
-
29
-
30
-
31
-
32
-
33
-
34
-
35
-
36
-
37
-
38
-
39
-
40
-
41
-
42
-
43
-
44
-
45
-
46
-
47
-
48
-
49
-
50
-
51
-
52
-
53
-
54
-
55
-
56
-
57
-
58
-
59
-
60
-
61
-
62
-
63
-
64
-
65
-
66
-
67
-
68
-
69
-
70
-
71
-
72
-
73
-
74
-
75
-
76
-
77
-
78
-
79
-
80
-
81
-
82
-
83
-
84
-
85
-
86
-
87
-
88
-
89
-
90
-
91
-
92
-
93
-
94
-
95
-
96
 |
 |
