HTC Shift User Guide - Page 31
Removing the Battery, Make sure the power is off so that you don't lose
 |
UPC - 821793007829
View all HTC Shift manuals
Add to My Manuals
Save this manual to your list of manuals |
Page 31 highlights
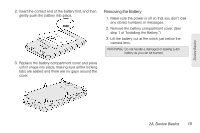
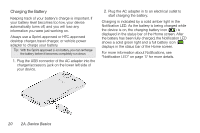
Device Basics 2. Insert the contact end of the battery first, and then gently push the battery into place. Removing the Battery 1. Make sure the power is off so that you don't lose any stored numbers or messages. 2. Remove the battery compartment cover. (See step 1 of "Installing the Battery.") 3. Lift the battery out at the notch just below the camera lens. WARNING: Do not handle a damaged or leaking Li-Ion battery as you can be burned. 3. Replace the battery compartment cover and press until it snaps into place, making sure all the locking tabs are seated and there are no gaps around the cover. 2A. Device Basics 19
-
 1
1 -
2
-
3
-
4
-
5
-
6
-
7
-
8
-
9
-
10
-
11
-
12
-
13
-
14
-
15
-
16
-
17
-
18
-
19
-
20
-
21
-
22
-
23
-
24
-
25
-
 26
26 -
 27
27 -
 28
28 -
 29
29 -
 30
30 -
 31
31 -
 32
32 -
 33
33 -
 34
34 -
 35
35 -
 36
36 -
37
-
38
-
39
-
40
-
41
-
42
-
43
-
44
-
45
-
46
-
47
-
48
-
49
-
50
-
51
-
52
-
53
-
54
-
55
-
56
-
57
-
58
-
59
-
60
-
61
-
62
-
63
-
64
-
65
-
66
-
67
-
68
-
69
-
70
-
71
-
72
-
73
-
74
-
75
-
76
-
77
-
78
-
79
-
80
-
81
-
82
-
83
-
84
-
85
-
86
-
87
-
88
-
89
-
90
-
91
-
92
-
93
-
94
-
95
-
96
-
97
-
98
-
99
-
100
-
101
-
102
-
103
-
104
-
105
-
106
-
107
-
108
-
109
-
110
-
111
-
112
-
113
-
114
-
115
-
116
-
117
-
118
-
119
-
120
-
121
-
122
-
123
-
124
-
125
-
126
-
127
-
128
-
129
-
130
-
131
-
132
-
133
-
134
-
135
-
136
-
137
-
138
-
139
-
140
-
141
-
142
-
143
-
144
-
145
-
146
-
147
-
148
-
149
-
150
-
151
-
152
-
153
-
154
-
155
-
156
-
157
-
158
-
159
-
160
-
161
-
162
-
163
-
164
-
165
-
166
-
167
-
168
-
169
-
170
-
171
-
172
-
173
-
174
-
175
-
176
-
177
-
178
-
179
-
180
-
181
-
182
-
183
-
184
-
185
-
186
-
187
-
188
-
189
-
190
-
191
-
192
-
193
-
194
-
195
-
196
-
197
-
198
-
199
-
200
-
201
-
202
-
203
-
204
-
205
-
206
-
207
-
208
-
209
-
210
-
211
-
212
-
213
-
214
-
215
-
216
-
217
-
218
-
219
-
220
-
221
-
222
-
223
-
224
-
225
-
226
-
227
-
228
-
229
-
230
-
231
-
232
-
233
-
234
-
235
-
236
-
237
-
238
-
239
-
240
-
241
-
242
-
243
-
244
-
245
-
246
-
247
-
248
-
249
-
250
-
251
-
252
-
253
-
254
-
255
-
256
-
257
-
258
-
259
-
260
-
261
-
262
-
263
-
264
-
265
-
266
-
267
-
268
-
269
-
270
-
271
-
272
-
273
-
274
-
275
-
276
-
277
-
278
-
279
-
280
-
281
-
282
-
283
-
284
-
285
-
286
-
287
-
288
-
289
-
290
-
291
-
292
-
293
-
294
 |
 |

2A. Device Basics
19
Device Basics
2.
Insert the contact end of the battery first, and then
gently push the battery into place.
3.
Replace the battery compartment cover and press
until it snaps into place, making sure all the locking
tabs are seated and there are no gaps around the
cover.
Removing the Battery
1.
Make sure the power is off so that you don’t lose
any stored numbers or messages.
2.
Remove the battery compartment cover. (See
step 1 of “Installing the Battery.”)
3.
Lift the battery out at the notch just below the
camera lens.
WARNING:
Do not handle a damaged or leaking Li-Ion
battery as you can be burned.