HP 2610 User Guide - Page 104
Basic Fax Setup, Auto Answer, Setup, To set up your HP all-in-one to a computer with two phone ports
 |
UPC - 829160502274
View all HP 2610 manuals
Add to My Manuals
Save this manual to your list of manuals |
Page 104 highlights
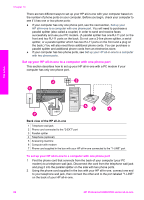
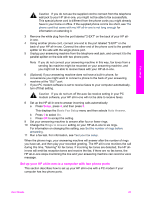
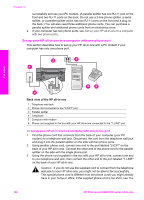
phone cord that came with my HP all-in-one is not long enough for information on extending it. 4 Remove the white plug from the port labeled "2-EXT" on the back of your HP allin-one. 5 If your PC modem software is set to receive faxes to your computer automatically, turn off that setting. Caution If you do not turn off the auto fax receive setting in your PC modem software, your HP all-in-one will not be able to receive faxes. 6 (Optional) Connect a phone to the other open phone port on the parallel splitter. 7 Set up the HP all-in-one to answer incoming calls manually: a Press Setup, press 4, and then press 3. This displays the Basic Fax Setup menu and then selects Auto Answer. b Press 2 to select Off. c Press OK to accept the setting. 8 Run a fax test. For information, see Test your fax setup. You must be available to respond in person to incoming fax calls, or your HP all-in-one cannot receive faxes. For information on receiving faxes manually, see Receive a fax manually. Set up your HP all-in-one to a computer with two phone ports Fax setup Back view of the HP all-in-one 1 Telephone wall jack 2 "IN" phone port on your computer 3 "OUT" phone port on your computer 4 Telephone 5 Computer with modem 6 Phone cord supplied in the box with your HP all-in-one connected to the "1-LINE" port To set up your HP all-in-one to a computer with two phone ports 1 Remove the white plug from the port labeled "2-EXT" on the back of your HP all- in-one. User Guide 101
-
 1
1 -
2
-
3
-
4
-
5
-
6
-
7
-
8
-
9
-
10
-
11
-
12
-
13
-
14
-
15
-
16
-
17
-
18
-
19
-
20
-
21
-
22
-
23
-
24
-
25
-
26
-
27
-
28
-
29
-
30
-
31
-
32
-
33
-
34
-
35
-
36
-
37
-
38
-
39
-
40
-
41
-
42
-
43
-
44
-
45
-
46
-
47
-
48
-
49
-
50
-
51
-
52
-
53
-
54
-
55
-
56
-
57
-
58
-
59
-
60
-
61
-
62
-
63
-
64
-
65
-
66
-
67
-
68
-
69
-
70
-
71
-
72
-
73
-
74
-
75
-
76
-
77
-
78
-
79
-
80
-
81
-
82
-
83
-
84
-
85
-
86
-
87
-
88
-
89
-
90
-
91
-
92
-
93
-
94
-
95
-
96
-
97
-
98
-
 99
99 -
 100
100 -
 101
101 -
 102
102 -
 103
103 -
 104
104 -
 105
105 -
 106
106 -
 107
107 -
 108
108 -
 109
109 -
110
-
111
-
112
-
113
-
114
-
115
-
116
-
117
-
118
-
119
-
120
-
121
-
122
-
123
-
124
-
125
-
126
-
127
-
128
-
129
-
130
-
131
-
132
-
133
-
134
-
135
-
136
-
137
-
138
-
139
-
140
-
141
-
142
-
143
-
144
-
145
-
146
-
147
-
148
-
149
-
150
-
151
-
152
-
153
-
154
-
155
-
156
-
157
-
158
-
159
-
160
-
161
-
162
-
163
-
164
-
165
-
166
-
167
-
168
-
169
-
170
-
171
-
172
-
173
-
174
-
175
-
176
-
177
-
178
-
179
-
180
-
181
-
182
-
183
-
184
-
185
-
186
-
187
-
188
-
189
-
190
-
191
-
192
-
193
-
194
-
195
-
196
-
197
-
198
-
199
-
200
-
201
-
202
-
203
-
204
-
205
-
206
-
207
-
208
-
209
-
210
-
211
-
212
-
213
-
214
-
215
-
216
-
217
-
218
-
219
-
220
-
221
-
222
-
223
-
224
-
225
-
226
-
227
-
228
-
229
-
230
-
231
-
232
-
233
-
234
-
235
-
236
-
237
-
238
-
239
-
240
-
241
 |
 |
