HP 3800 HP Color LaserJet 3000, 3600, 3800 series Printers - User Guide - Page 216
Enabling memory, To enable memory for Windows
 |
UPC - 689466270464
View all HP 3800 manuals
Add to My Manuals
Save this manual to your list of manuals |
Page 216 highlights
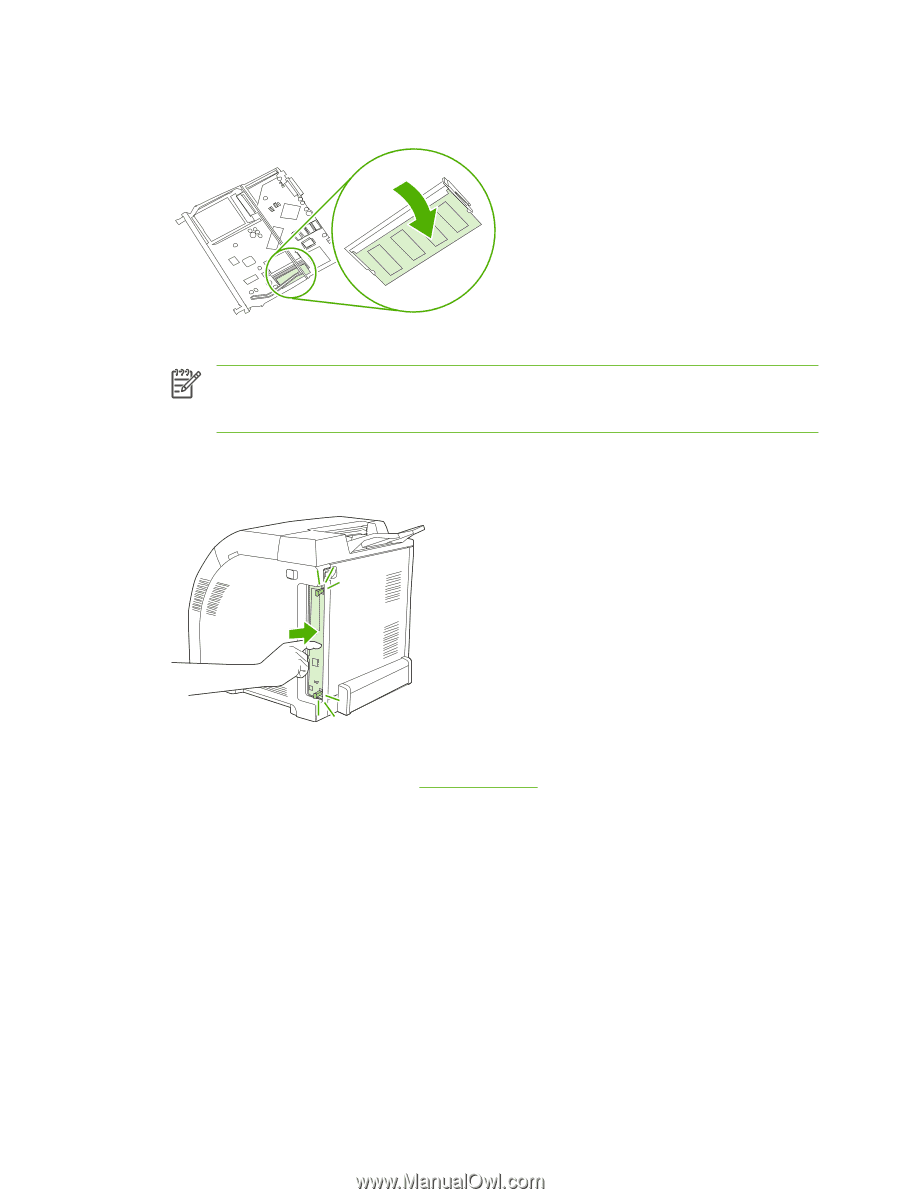
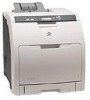
6. Push down on the DIMM until both latches engage the DIMM. NOTE If you have difficulty inserting the DIMM, make sure that the notch on the bottom of the DIMM is aligned with the bar in the slot. If the DIMM still does not go in, make sure that you are using the correct DIMM type. 7. Align the edge of the formatter board in the tracks at the top and bottom of the slot, and then slide the board back into the printer. Push the formatter firmly until you hear the formatter latches click into place. 8. Reconnect the power cable and USB or network cable, and then turn on the printer. 9. After installing a memory DIMM, see Enabling memory. Enabling memory If you installed a memory DIMM, set the printer driver to recognize the newly added memory. To enable memory for Windows 1. On the Start menu, point to Settings, and click Printers or Printers and Faxes. 2. Select this printer and select Properties. 3. On the Configure tab, click More. 4. In the Total Memory field, type or select the total amount of memory that is now installed. 202 Appendix E Working with memory ENWW
-
 1
1 -
2
-
3
-
4
-
5
-
6
-
7
-
8
-
9
-
10
-
11
-
12
-
13
-
14
-
15
-
16
-
17
-
18
-
19
-
20
-
21
-
22
-
23
-
24
-
25
-
26
-
27
-
28
-
29
-
30
-
31
-
32
-
33
-
34
-
35
-
36
-
37
-
38
-
39
-
40
-
41
-
42
-
43
-
44
-
45
-
46
-
47
-
48
-
49
-
50
-
51
-
52
-
53
-
54
-
55
-
56
-
57
-
58
-
59
-
60
-
61
-
62
-
63
-
64
-
65
-
66
-
67
-
68
-
69
-
70
-
71
-
72
-
73
-
74
-
75
-
76
-
77
-
78
-
79
-
80
-
81
-
82
-
83
-
84
-
85
-
86
-
87
-
88
-
89
-
90
-
91
-
92
-
93
-
94
-
95
-
96
-
97
-
98
-
99
-
100
-
101
-
102
-
103
-
104
-
105
-
106
-
107
-
108
-
109
-
110
-
111
-
112
-
113
-
114
-
115
-
116
-
117
-
118
-
119
-
120
-
121
-
122
-
123
-
124
-
125
-
126
-
127
-
128
-
129
-
130
-
131
-
132
-
133
-
134
-
135
-
136
-
137
-
138
-
139
-
140
-
141
-
142
-
143
-
144
-
145
-
146
-
147
-
148
-
149
-
150
-
151
-
152
-
153
-
154
-
155
-
156
-
157
-
158
-
159
-
160
-
161
-
162
-
163
-
164
-
165
-
166
-
167
-
168
-
169
-
170
-
171
-
172
-
173
-
174
-
175
-
176
-
177
-
178
-
179
-
180
-
181
-
182
-
183
-
184
-
185
-
186
-
187
-
188
-
189
-
190
-
191
-
192
-
193
-
194
-
195
-
196
-
197
-
198
-
199
-
200
-
201
-
202
-
203
-
204
-
205
-
206
-
207
-
208
-
209
-
210
-
 211
211 -
 212
212 -
 213
213 -
 214
214 -
 215
215 -
 216
216 -
 217
217 -
 218
218 -
 219
219 -
 220
220 -
 221
221 -
222
-
223
-
224
-
225
-
226
 |
 |