HP 4700n HP Color LaserJet 4700 - Software Technical Reference (External) - Page 136
Using Job Storage features when printing, Releasing a Job Storage print job, Print, Properties
 |
UPC - 829160845630
View all HP 4700n manuals
Add to My Manuals
Save this manual to your list of manuals |
Page 136 highlights
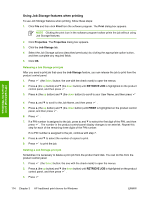
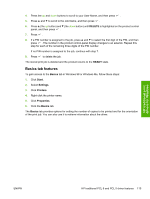
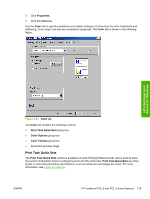
HP traditional print drivers for Windows Using Job Storage features when printing To use Job Storage features when printing, follow these steps: 1. Click File and then click Print from the software program. The Print dialog box appears. NOTE Clicking the print icon in the software program toolbar prints the job without using Job Storage features. 2. Click Properties. The Properties dialog box appears. 3. Click the Job Storage tab. 4. Select the Job Storage options (described previously) by clicking the appropriate option button, and then complete any required fields. 5. Click OK. Releasing a Job Storage print job After you send a print job that uses the Job Storage feature, you can release the job to print from the product control panel. 1. Press (the Select button; the one with the check mark) to open the menus. 2. Press (the up button) and (the down button) until RETRIEVE JOB is highlighted on the product control panel, and then press . 3. Press (the up button) and (the down button) to scroll to your User Name, and then press . 4. Press and to scroll to the Job Name, and then press . 5. Press (the up button) and (the down button) until PRINT is highlighted on the product control panel, and then press . 6. Press . 7. If a PIN number is assigned to the job, press and to select the first digit of the PIN, and then press . The number in the product control-panel display changes to an asterisk. Repeat this step for each of the remaining three digits of the PIN number. If no PIN number is assigned to the job, continue with step 7. 8. Press and to select the number of copies to print. 9. Press to print the job. Deleting a Job Storage print job Sometimes it is necessary to delete a print job from the product hard disk. You can do this from the product control panel. 1. Press (the Select button; the one with the check mark) to open the menus. 2. Press (the up button) and (the down button) until RETRIEVE JOB is highlighted on the product control panel, and then press . 3. Press 114 Chapter 3 HP traditional print drivers for Windows ENWW
-
 1
1 -
2
-
3
-
4
-
5
-
6
-
7
-
8
-
9
-
10
-
11
-
12
-
13
-
14
-
15
-
16
-
17
-
18
-
19
-
20
-
21
-
22
-
23
-
24
-
25
-
26
-
27
-
28
-
29
-
30
-
31
-
32
-
33
-
34
-
35
-
36
-
37
-
38
-
39
-
40
-
41
-
42
-
43
-
44
-
45
-
46
-
47
-
48
-
49
-
50
-
51
-
52
-
53
-
54
-
55
-
56
-
57
-
58
-
59
-
60
-
61
-
62
-
63
-
64
-
65
-
66
-
67
-
68
-
69
-
70
-
71
-
72
-
73
-
74
-
75
-
76
-
77
-
78
-
79
-
80
-
81
-
82
-
83
-
84
-
85
-
86
-
87
-
88
-
89
-
90
-
91
-
92
-
93
-
94
-
95
-
96
-
97
-
98
-
99
-
100
-
101
-
102
-
103
-
104
-
105
-
106
-
107
-
108
-
109
-
110
-
111
-
112
-
113
-
114
-
115
-
116
-
117
-
118
-
119
-
120
-
121
-
122
-
123
-
124
-
125
-
126
-
127
-
128
-
129
-
130
-
 131
131 -
 132
132 -
 133
133 -
 134
134 -
 135
135 -
 136
136 -
 137
137 -
 138
138 -
 139
139 -
 140
140 -
 141
141 -
142
-
143
-
144
-
145
-
146
-
147
-
148
-
149
-
150
-
151
-
152
-
153
-
154
-
155
-
156
-
157
-
158
-
159
-
160
-
161
-
162
-
163
-
164
-
165
-
166
-
167
-
168
-
169
-
170
-
171
-
172
-
173
-
174
-
175
-
176
-
177
-
178
-
179
-
180
-
181
-
182
-
183
-
184
-
185
-
186
-
187
-
188
-
189
-
190
-
191
-
192
-
193
-
194
-
195
-
196
-
197
-
198
-
199
-
200
-
201
-
202
-
203
-
204
-
205
-
206
-
207
-
208
-
209
-
210
-
211
-
212
-
213
-
214
-
215
-
216
-
217
-
218
-
219
-
220
-
221
-
222
-
223
-
224
-
225
-
226
-
227
-
228
-
229
-
230
-
231
-
232
-
233
-
234
-
235
-
236
-
237
-
238
-
239
-
240
-
241
-
242
-
243
-
244
-
245
-
246
-
247
-
248
-
249
-
250
-
251
-
252
-
253
-
254
-
255
-
256
-
257
-
258
-
259
-
260
-
261
-
262
-
263
-
264
-
265
-
266
-
267
-
268
-
269
-
270
-
271
-
272
-
273
-
274
-
275
-
276
-
277
-
278
-
279
-
280
-
281
-
282
-
283
-
284
-
285
-
286
-
287
-
288
-
289
-
290
-
291
-
292
-
293
-
294
-
295
-
296
-
297
-
298
-
299
-
300
-
301
-
302
-
303
-
304
-
305
-
306
-
307
-
308
-
309
-
310
-
311
-
312
-
313
-
314
-
315
-
316
-
317
-
318
-
319
-
320
-
321
-
322
-
323
-
324
-
325
-
326
-
327
-
328
-
329
-
330
-
331
-
332
-
333
-
334
-
335
-
336
-
337
-
338
-
339
-
340
-
341
-
342
-
343
-
344
-
345
-
346
-
347
-
348
-
349
-
350
-
351
-
352
-
353
-
354
-
355
-
356
-
357
-
358
-
359
-
360
-
361
-
362
-
363
-
364
-
365
-
366
-
367
-
368
-
369
-
370
-
371
-
372
 |
 |