HP 935 hp photosmart 930 series digital camera user manual - Page 69
Print Setup, Share, Images: ALL, Print Size, Paper Size, as in this example
 |
UPC - 808736469753
View all HP 935 manuals
Add to My Manuals
Save this manual to your list of manuals |
Page 69 highlights
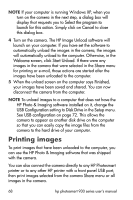
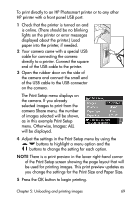
To print directly to an HP Photosmart printer or to any other HP printer with a front panel USB port: 1 Check that the printer is turned on and is online. (There should be no blinking lights on the printer or error messages displayed about the printer.) Load paper into the printer, if needed. 2 Your camera came with a special USB cable for connecting the camera directly to a printer. Connect the square end of the USB cable to the printer. 3 Open the rubber door on the side of the camera and connect the small end of the USB cable to the USB connector on the camera. The Print Setup menu displays on the camera. If you already selected images to print from the camera Share menu, the number of images selected will be shown, as in this example Print Setup menu. Otherwise, Images: ALL will be displayed. 4 Adjust the settings in the Print Setup menu by using the buttons to highlight a menu option and the buttons to change the setting for each option. NOTE There is a print preview in the lower right-hand corner of the Print Setup screen showing the page layout that will be used for printing images. This print preview updates as you change the settings for the Print Size and Paper Size. 5 Press the OK button to begin printing. Chapter 5: Unloading and printing images 69
-
 1
1 -
2
-
3
-
4
-
5
-
6
-
7
-
8
-
9
-
10
-
11
-
12
-
13
-
14
-
15
-
16
-
17
-
18
-
19
-
20
-
21
-
22
-
23
-
24
-
25
-
26
-
27
-
28
-
29
-
30
-
31
-
32
-
33
-
34
-
35
-
36
-
37
-
38
-
39
-
40
-
41
-
42
-
43
-
44
-
45
-
46
-
47
-
48
-
49
-
50
-
51
-
52
-
53
-
54
-
55
-
56
-
57
-
58
-
59
-
60
-
61
-
62
-
63
-
 64
64 -
 65
65 -
 66
66 -
 67
67 -
 68
68 -
 69
69 -
 70
70 -
 71
71 -
 72
72 -
 73
73 -
 74
74 -
75
-
76
-
77
-
78
-
79
-
80
-
81
-
82
-
83
-
84
-
85
-
86
-
87
-
88
-
89
-
90
-
91
-
92
-
93
-
94
-
95
-
96
-
97
-
98
-
99
-
100
-
101
-
102
-
103
-
104
-
105
-
106
-
107
-
108
-
109
-
110
-
111
-
112
-
113
-
114
-
115
-
116
-
117
-
118
 |
 |
