HP 9500n HP Color LaserJet 9500n/9500hdn - User Reference Guide - Page 43
Tray X [x Dimension] X [y Dimension] [inches Or Millimeters], Size Specified By User
 |
UPC - 808736429672
View all HP 9500n manuals
Add to My Manuals
Save this manual to your list of manuals |
Page 43 highlights
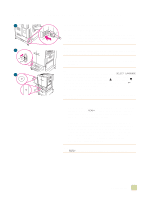
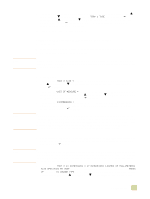
Note Note Note 9 The media type is set to Plain by default. If you want to change this setting, use (UP button) or (DOWN button) to scroll to TRAY 1 TYPE, and then press (SELECT). Use (UP button) or (DOWN button) to scroll to the media type you want, and then press (SELECT). For more information about media types, see "Supported types of media" on page 88. 10 Press PAUSE/RESUME to close the menus. Setting a custom media size and type for tray 2, tray 3, or tray 4 1 Open the tray. 2 Make sure that the paper guides rest against the stack of media in the tray. 3 Set the custom/standard switch to Custom. If the media size is not marked on the tray guide, it is a custom media size. If the media size is marked on the tray guide see "Setting a standard media size and type for tray 2, tray 3, or tray 4" on page 39. 4 Close the tray. 5 The message TRAY X SIZE = appears, with the Any Custom size selected by default. Use (UP button) or (DOWN button) to scroll to the Custom setting, and then press (SELECT). 6 The message UNIT OF MEASURE = appears, with the Inches setting selected by default. If you want to change this setting, use (UP button) or (DOWN button) to scroll to the Millimeters setting, and then press (SELECT). 7 The message X DIMENSION = appears, with 11.7 inches (or 297 millimeters) selected by default. Use the numeric keypad to type the X dimension measurement of your media, and then press (SELECT). The X dimension is the length of the page side that is perpendicular to the direction that the page feeds into the printer. For tray 2 and tray 3, the X dimension measurement must be between 5.8 and 11.7 inches (or 148 and 297 millimeters). For tray 4, the X dimension must be between 7.2 and 11.7 inches (182 and 297 millimeters).You can find the X dimension measurement of your media on the paper guides inside the tray. 8 The message Y dimension = appears, with 17 inches (or 432 millimeters) selected by default. Use the numeric keypad to type the Y dimension measurement of your media, and then press (SELECT). The Y dimension is the length of the page that is parallel to the direction that the page feeds into the printer. The Y dimension measurement must be between 8.27 and 17 inches (or 210 and 432 millimeters). You can find the Y dimension measurement of your media on the paper guides inside the tray. 9 The message TRAY X [X DIMENSION] X [Y DIMENSION] [INCHES OR MILLIMETERS] SIZE SPECIFIED BY USER appears. This message alternates with the message PRESS (SELECT) TO CHANGE TYPE. The media type is set to Plain by default. If you want to change this setting, use (UP button) or (DOWN button) to scroll to the media 1 Printer setup 41
-
 1
1 -
2
-
3
-
4
-
5
-
6
-
7
-
8
-
9
-
10
-
11
-
12
-
13
-
14
-
15
-
16
-
17
-
18
-
19
-
20
-
21
-
22
-
23
-
24
-
25
-
26
-
27
-
28
-
29
-
30
-
31
-
32
-
33
-
34
-
35
-
36
-
37
-
 38
38 -
 39
39 -
 40
40 -
 41
41 -
 42
42 -
 43
43 -
 44
44 -
 45
45 -
 46
46 -
 47
47 -
 48
48 -
49
-
50
-
51
-
52
-
53
-
54
-
55
-
56
-
57
-
58
-
59
-
60
-
61
-
62
-
63
-
64
-
65
-
66
-
67
-
68
-
69
-
70
-
71
-
72
-
73
-
74
-
75
-
76
-
77
-
78
-
79
-
80
-
81
-
82
-
83
-
84
-
85
-
86
-
87
-
88
-
89
-
90
-
91
-
92
-
93
-
94
-
95
-
96
-
97
-
98
-
99
-
100
-
101
-
102
-
103
-
104
-
105
-
106
-
107
-
108
-
109
-
110
-
111
-
112
-
113
-
114
-
115
-
116
-
117
-
118
-
119
-
120
-
121
-
122
-
123
-
124
-
125
-
126
-
127
-
128
-
129
-
130
-
131
-
132
-
133
-
134
-
135
-
136
-
137
-
138
-
139
-
140
-
141
-
142
-
143
-
144
-
145
-
146
-
147
-
148
-
149
-
150
-
151
-
152
-
153
-
154
-
155
-
156
-
157
-
158
-
159
-
160
-
161
-
162
-
163
-
164
-
165
-
166
-
167
-
168
-
169
-
170
-
171
-
172
-
173
-
174
-
175
-
176
-
177
-
178
-
179
-
180
-
181
-
182
-
183
-
184
-
185
-
186
-
187
-
188
-
189
-
190
-
191
-
192
-
193
-
194
-
195
-
196
-
197
-
198
-
199
-
200
-
201
-
202
-
203
-
204
-
205
-
206
-
207
-
208
-
209
-
210
-
211
-
212
-
213
-
214
-
215
-
216
-
217
-
218
-
219
-
220
-
221
-
222
-
223
-
224
-
225
-
226
-
227
-
228
-
229
-
230
-
231
-
232
-
233
-
234
-
235
-
236
-
237
-
238
-
239
-
240
-
241
-
242
-
243
-
244
-
245
-
246
-
247
-
248
-
249
-
250
-
251
-
252
-
253
-
254
-
255
-
256
-
257
-
258
-
259
-
260
-
261
-
262
-
263
-
264
-
265
-
266
-
267
-
268
-
269
-
270
-
271
-
272
-
273
-
274
-
275
-
276
-
277
-
278
-
279
-
280
-
281
-
282
-
283
-
284
-
285
-
286
-
287
-
288
-
289
-
290
-
291
-
292
-
293
-
294
-
295
-
296
-
297
-
298
-
299
-
300
-
301
-
302
-
303
-
304
-
305
-
306
-
307
-
308
-
309
-
310
-
311
-
312
-
313
-
314
-
315
-
316
-
317
-
318
-
319
-
320
-
321
-
322
-
323
-
324
-
325
-
326
-
327
-
328
-
329
-
330
-
331
-
332
-
333
-
334
-
335
-
336
-
337
-
338
-
339
-
340
-
341
-
342
-
343
-
344
-
345
-
346
-
347
-
348
-
349
-
350
 |
 |
