HP Color LaserJet Pro MFP M277 User Guide - Page 134
Eliminate lines or streaks when using the document feeder, Check the paper settings
 |
View all HP Color LaserJet Pro MFP M277 manuals
Add to My Manuals
Save this manual to your list of manuals |
Page 134 highlights
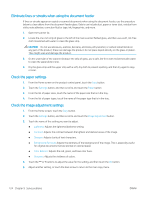
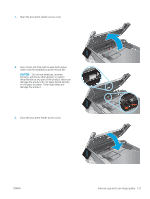
Eliminate lines or streaks when using the document feeder If lines or streaks appear on copied or scanned documents when using the document feeder, use the procedure below to clean debris from the document feeder glass. Debris can include dust, paper or toner dust, residue from sticky note adhesive, correction fluid or tape, ink, fingerprints, and more. 1. Open the scanner lid. 2. Locate the one-inch strip of glass to the left of the main scanner flatbed glass, and then use a soft, lint-free cloth moistened with water to clean the glass strip. CAUTION: Do not use abrasives, acetone, benzene, ammonia, ethyl alcohol, or carbon tetrachloride on any part of the product; these can damage the product. Do not place liquids directly on the glass or platen. They might seep and damage the product. 3. On the underside of the scanner lid above the strip of glass, use a soft, lint-free cloth moistened with water to clean the upper plastic strip. 4. Dry the glass strip and the upper strip with a soft, dry cloth to prevent spotting, and then try again to copy or scan. Check the paper settings 1. From the Home screen on the product control panel, touch the Copy button. 2. Touch the Settings button, and then scroll to and touch the Paper button. 3. From the list of paper sizes, touch the name of the paper size that is in the tray. 4. From the list of paper types, touch the name of the paper type that is in the tray. Check the image adjustment settings 1. From the Home screen, touch the Copy button. 2. Touch the Settings button, and then scroll to and touch the Image Adjustment button. 3. Touch the name of the setting you want to adjust. ● Lightness: Adjusts the lightness/darkness setting. ● Contrast: Adjusts the contrast between the lightest and darkest areas of the image. ● Sharpen: Adjusts clarity of text characters. ● Background Removal: Adjusts the darkness of the background of the image. This is especially useful for original documents that are printed on colored paper. ● Color Balance: Adjusts the red, green, and blue color hues. ● Grayness: Adjusts the vividness of colors. 4. Touch the - or + buttons to adjust the value for the setting, and then touch the OK button. 5. Adjust another setting, or touch the back arrow to return to the main copy menu. 124 Chapter 9 Solve problems ENWW
-
 1
1 -
2
-
3
-
4
-
5
-
6
-
7
-
8
-
9
-
10
-
11
-
12
-
13
-
14
-
15
-
16
-
17
-
18
-
19
-
20
-
21
-
22
-
23
-
24
-
25
-
26
-
27
-
28
-
29
-
30
-
31
-
32
-
33
-
34
-
35
-
36
-
37
-
38
-
39
-
40
-
41
-
42
-
43
-
44
-
45
-
46
-
47
-
48
-
49
-
50
-
51
-
52
-
53
-
54
-
55
-
56
-
57
-
58
-
59
-
60
-
61
-
62
-
63
-
64
-
65
-
66
-
67
-
68
-
69
-
70
-
71
-
72
-
73
-
74
-
75
-
76
-
77
-
78
-
79
-
80
-
81
-
82
-
83
-
84
-
85
-
86
-
87
-
88
-
89
-
90
-
91
-
92
-
93
-
94
-
95
-
96
-
97
-
98
-
99
-
100
-
101
-
102
-
103
-
104
-
105
-
106
-
107
-
108
-
109
-
110
-
111
-
112
-
113
-
114
-
115
-
116
-
117
-
118
-
119
-
120
-
121
-
122
-
123
-
124
-
125
-
126
-
127
-
128
-
 129
129 -
 130
130 -
 131
131 -
 132
132 -
 133
133 -
 134
134 -
 135
135 -
 136
136 -
 137
137 -
 138
138 -
 139
139 -
140
-
141
-
142
-
143
-
144
-
145
-
146
-
147
-
148
-
149
-
150
-
151
-
152
-
153
-
154
-
155
-
156
 |
 |