HP Color LaserJet Pro MFP M277 User Guide - Page 139
Check the send-fax resolution settings, Check the error-correction settings
 |
View all HP Color LaserJet Pro MFP M277 manuals
Add to My Manuals
Save this manual to your list of manuals |
Page 139 highlights
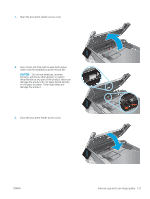
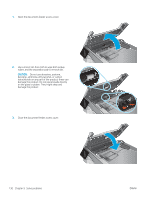
Check the send-fax resolution settings If the product was unable to send a fax because the receiving fax machine did not answer or was busy, the product attempts to redial based on the redial-on-busy, redial-on-no-answer, and redial-on-communicationerror options. 1. From the Home screen on the product control panel, touch the Setup button. 2. Touch the Fax Setup menu. 3. Touch the Advanced Setup menu. 4. Open the Fax Resolution menu. Check the error-correction settings Usually, the product monitors the signals on the telephone line while it is sending or receiving a fax. If the product detects an error during the transmission and the error-correction setting is On, the product can request that the portion of the fax be resent. The factory-set default for error correction is On. You should turn off error correction only if you are having trouble sending or receiving a fax, and you are willing to accept the errors in the transmission. Turning off the setting might be useful when you are trying to send a fax overseas or receive one from overseas, or if you are using a satellite telephone connection. 1. From the Home screen on the product control panel, touch the Setup button. 2. Touch the Service menu. 3. Touch the Fax Service menu. 4. Touch the Error Correction button, and then touch the On button. Check the fit-to-page setting If the product printed a fax job off the page, turn on the fit-to-page feature from the product control panel. NOTE: Make sure that the default paper size setting matches the size of the paper in the tray. 1. From the Home screen on the product control panel, touch the Setup button. 2. Touch the Fax Setup menu. 3. Touch the Advanced Setup menu. 4. Touch the Fit to Page button, and then touch the On button. Clean the pickup rollers and separation pad in the document feeder If the document feeder experiences paper-handling problems, such as jams or multiple-page feeds, clean the document-feeder rollers and separation pad. ENWW Improve fax image quality 129
-
 1
1 -
2
-
3
-
4
-
5
-
6
-
7
-
8
-
9
-
10
-
11
-
12
-
13
-
14
-
15
-
16
-
17
-
18
-
19
-
20
-
21
-
22
-
23
-
24
-
25
-
26
-
27
-
28
-
29
-
30
-
31
-
32
-
33
-
34
-
35
-
36
-
37
-
38
-
39
-
40
-
41
-
42
-
43
-
44
-
45
-
46
-
47
-
48
-
49
-
50
-
51
-
52
-
53
-
54
-
55
-
56
-
57
-
58
-
59
-
60
-
61
-
62
-
63
-
64
-
65
-
66
-
67
-
68
-
69
-
70
-
71
-
72
-
73
-
74
-
75
-
76
-
77
-
78
-
79
-
80
-
81
-
82
-
83
-
84
-
85
-
86
-
87
-
88
-
89
-
90
-
91
-
92
-
93
-
94
-
95
-
96
-
97
-
98
-
99
-
100
-
101
-
102
-
103
-
104
-
105
-
106
-
107
-
108
-
109
-
110
-
111
-
112
-
113
-
114
-
115
-
116
-
117
-
118
-
119
-
120
-
121
-
122
-
123
-
124
-
125
-
126
-
127
-
128
-
129
-
130
-
131
-
132
-
133
-
 134
134 -
 135
135 -
 136
136 -
 137
137 -
 138
138 -
 139
139 -
 140
140 -
 141
141 -
 142
142 -
 143
143 -
 144
144 -
145
-
146
-
147
-
148
-
149
-
150
-
151
-
152
-
153
-
154
-
155
-
156
 |
 |