HP D7560 User Guide - Page 222
Prepare the product for shipment, Secure the ink system, Remove the control panel faceplate - photosmart repair
 |
UPC - 883585923687
View all HP D7560 manuals
Add to My Manuals
Save this manual to your list of manuals |
Page 222 highlights
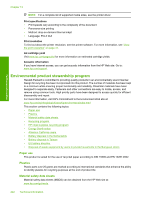
HP warranty and support Prepare the product for shipment If, after contacting HP support or returning to the point of purchase, you are requested to send the HP Photosmart in for service, make sure you remove and keep the following items before returning your product: • The control panel faceplate • The power cord, USB cable, and any other cable connected to the HP Photosmart CAUTION: The replacement HP Photosmart will not be shipped with a power cord. Store the power cord in a safe place until the replacement HP Photosmart arrives. • Any paper loaded in the input tray This section contains the following topics: • Secure the ink system • Remove the control panel faceplate Secure the ink system Contact HP support for information about how you should secure the ink system to prevent ink from leaking in the HP Photosmart during shipment. If you receive a replacement HP Photosmart, refer to the instructions included in the box for information about how to secure the ink system. The replacement HP Photosmart might come with ink cartridges that you can use to install in your device to prevent the ink system from leaking during shipment. NOTE: This information does not apply to customers in Japan. For information on service options in Japan, see "HP Quick Exchange Service (Japan)" on page 218. Remove the control panel faceplate Remove the control panel faceplate before returning the HP Photosmart for repair. NOTE: This information does not apply to customers in Japan. For information on service options in Japan, see "HP Quick Exchange Service (Japan)" on page 218. CAUTION: The HP Photosmart must be unplugged before following these steps. To remove the control panel faceplate 1. Press the On button to turn off the product. 2. Unplug the power cord, and then disconnect it from the product. Do not return the power cord with the product. 3. Remove the control panel faceplate as follows: a. Place your hands on each side of the control panel faceplate. b. Use your fingertips to pry the control panel faceplate off. Prepare the product for shipment 219
-
 1
1 -
2
-
3
-
4
-
5
-
6
-
7
-
8
-
9
-
10
-
11
-
12
-
13
-
14
-
15
-
16
-
17
-
18
-
19
-
20
-
21
-
22
-
23
-
24
-
25
-
26
-
27
-
28
-
29
-
30
-
31
-
32
-
33
-
34
-
35
-
36
-
37
-
38
-
39
-
40
-
41
-
42
-
43
-
44
-
45
-
46
-
47
-
48
-
49
-
50
-
51
-
52
-
53
-
54
-
55
-
56
-
57
-
58
-
59
-
60
-
61
-
62
-
63
-
64
-
65
-
66
-
67
-
68
-
69
-
70
-
71
-
72
-
73
-
74
-
75
-
76
-
77
-
78
-
79
-
80
-
81
-
82
-
83
-
84
-
85
-
86
-
87
-
88
-
89
-
90
-
91
-
92
-
93
-
94
-
95
-
96
-
97
-
98
-
99
-
100
-
101
-
102
-
103
-
104
-
105
-
106
-
107
-
108
-
109
-
110
-
111
-
112
-
113
-
114
-
115
-
116
-
117
-
118
-
119
-
120
-
121
-
122
-
123
-
124
-
125
-
126
-
127
-
128
-
129
-
130
-
131
-
132
-
133
-
134
-
135
-
136
-
137
-
138
-
139
-
140
-
141
-
142
-
143
-
144
-
145
-
146
-
147
-
148
-
149
-
150
-
151
-
152
-
153
-
154
-
155
-
156
-
157
-
158
-
159
-
160
-
161
-
162
-
163
-
164
-
165
-
166
-
167
-
168
-
169
-
170
-
171
-
172
-
173
-
174
-
175
-
176
-
177
-
178
-
179
-
180
-
181
-
182
-
183
-
184
-
185
-
186
-
187
-
188
-
189
-
190
-
191
-
192
-
193
-
194
-
195
-
196
-
197
-
198
-
199
-
200
-
201
-
202
-
203
-
204
-
205
-
206
-
207
-
208
-
209
-
210
-
211
-
212
-
213
-
214
-
215
-
216
-
 217
217 -
 218
218 -
 219
219 -
 220
220 -
 221
221 -
 222
222 -
 223
223 -
 224
224 -
 225
225 -
 226
226 -
 227
227 -
228
-
229
-
230
-
231
-
232
-
233
-
234
-
235
-
236
-
237
 |
 |