HP D7560 User Guide - Page 88
Clean the HP Photosmart, Turn off the HP Photosmart - photosmart printer troubleshooting
 |
UPC - 883585923687
View all HP D7560 manuals
Add to My Manuals
Save this manual to your list of manuals |
Page 88 highlights
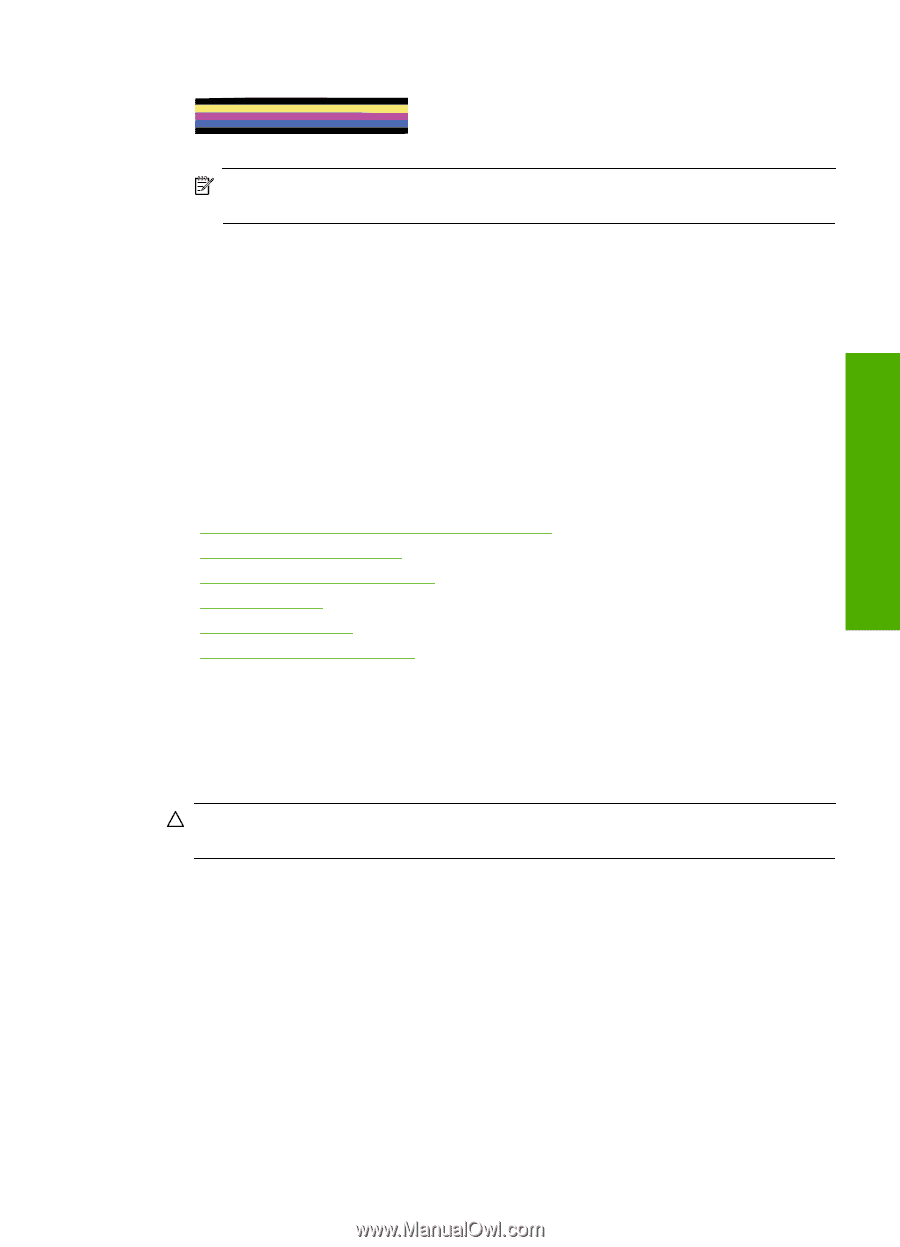
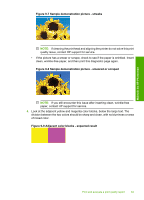
Maintain the HP Photosmart Figure 9-15 Color bars - color mixing (yellow bar contains magenta streaks) NOTE: If cleaning the printhead does not solve this print quality issue, contact HP support for service. If you do not see any defects on the print quality report, then the printing system is working correctly. There is no reason to replace supplies or have the product serviced, because they are functioning properly. If you still have a print quality problem, here are some other things you can check: • Check the paper. • Check the print settings. • Make sure your image has sufficient resolution. • If the problem seems confined to a band near the edge of your printout, use the software you installed with the product or another software application to rotate the image 180 degrees. The problem might not appear on the other end of the print. Related topics • "Load full-size paper or small-size photo paper" on page 31 • "Replace the ink cartridges" on page 75 • "Check the estimated ink levels" on page 74 • "Align the printer" on page 80 • "Clean the printhead" on page 79 • "Print quality troubleshooting" on page 102 Clean the HP Photosmart Use a soft cloth or slightly moistened sponge to wipe dust, smudges, and stains off the case. The interior of the HP Photosmart does not require cleaning. Keep fluids away from the control panel and the interior of the HP Photosmart. CAUTION: To avoid damage to the exterior of the HP Photosmart, do not use alcohol or alcohol-based cleaning products. Turn off the HP Photosmart To avoid damaging the product, you must properly shut it down by using the On button located on the product. Wait until the On light turns off before you unplug the power cord or turn off a power strip. Turn off the HP Photosmart 85
-
 1
1 -
2
-
3
-
4
-
5
-
6
-
7
-
8
-
9
-
10
-
11
-
12
-
13
-
14
-
15
-
16
-
17
-
18
-
19
-
20
-
21
-
22
-
23
-
24
-
25
-
26
-
27
-
28
-
29
-
30
-
31
-
32
-
33
-
34
-
35
-
36
-
37
-
38
-
39
-
40
-
41
-
42
-
43
-
44
-
45
-
46
-
47
-
48
-
49
-
50
-
51
-
52
-
53
-
54
-
55
-
56
-
57
-
58
-
59
-
60
-
61
-
62
-
63
-
64
-
65
-
66
-
67
-
68
-
69
-
70
-
71
-
72
-
73
-
74
-
75
-
76
-
77
-
78
-
79
-
80
-
81
-
82
-
 83
83 -
 84
84 -
 85
85 -
 86
86 -
 87
87 -
 88
88 -
 89
89 -
 90
90 -
 91
91 -
 92
92 -
 93
93 -
94
-
95
-
96
-
97
-
98
-
99
-
100
-
101
-
102
-
103
-
104
-
105
-
106
-
107
-
108
-
109
-
110
-
111
-
112
-
113
-
114
-
115
-
116
-
117
-
118
-
119
-
120
-
121
-
122
-
123
-
124
-
125
-
126
-
127
-
128
-
129
-
130
-
131
-
132
-
133
-
134
-
135
-
136
-
137
-
138
-
139
-
140
-
141
-
142
-
143
-
144
-
145
-
146
-
147
-
148
-
149
-
150
-
151
-
152
-
153
-
154
-
155
-
156
-
157
-
158
-
159
-
160
-
161
-
162
-
163
-
164
-
165
-
166
-
167
-
168
-
169
-
170
-
171
-
172
-
173
-
174
-
175
-
176
-
177
-
178
-
179
-
180
-
181
-
182
-
183
-
184
-
185
-
186
-
187
-
188
-
189
-
190
-
191
-
192
-
193
-
194
-
195
-
196
-
197
-
198
-
199
-
200
-
201
-
202
-
203
-
204
-
205
-
206
-
207
-
208
-
209
-
210
-
211
-
212
-
213
-
214
-
215
-
216
-
217
-
218
-
219
-
220
-
221
-
222
-
223
-
224
-
225
-
226
-
227
-
228
-
229
-
230
-
231
-
232
-
233
-
234
-
235
-
236
-
237
 |
 |