HP D7560 User Guide - Page 42
Load a CD/DVD, computer. You can design and create a custom label for your CD or DVD using - photosmart manual
 |
UPC - 883585923687
View all HP D7560 manuals
Add to My Manuals
Save this manual to your list of manuals |
Page 42 highlights
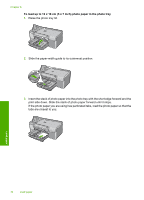
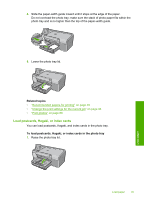
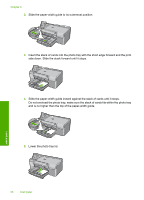
HP Premium Inkjet Transparency Film ▲ Insert the film so that the white transparency strip (with arrows and the HP logo) is on top and is going into the input tray first. NOTE: The HP Photosmart cannot automatically detect the paper type. For best results, set the paper type to transparency film in the software before printing onto transparency film. HP Iron-on Transfers 1. Flatten the transfer sheet completely before using it; do not load curled sheets. TIP: To prevent curling, keep transfer sheets sealed in the original package until you are ready to use them. 2. Locate the blue stripe on the nonprinting side of the transfer paper and then manually feed one sheet at a time into the input tray with the blue stripe facing up. HP Greeting Cards, HP Photo Greeting Cards, or HP Textured Greeting Cards ▲ Insert a small stack of HP greeting card paper into the input tray with the print side down; slide the stack of cards forward until it stops. TIP: Make sure the area on which you want to print is inserted first, print side down in the input tray. Related topics • "Change the print settings for the current job" on page 46 • "Recommended papers for printing" on page 29 Load a CD/DVD In addition to printing on paper, the HP Photosmart enables you to print directly on the surface of specially coated CDs and DVDs for print jobs started from a connected computer. You can design and create a custom label for your CD or DVD using the software that came with the HP Photosmart. You can then print the label on your printable CD or DVD media. TIP: It is recommended that you write your data to the CD or DVD before printing the label on it. NOTE: The HP Photosmart does not support a CD/DVD print job started from the control panel. Load paper Load a CD/DVD 39
-
 1
1 -
2
-
3
-
4
-
5
-
6
-
7
-
8
-
9
-
10
-
11
-
12
-
13
-
14
-
15
-
16
-
17
-
18
-
19
-
20
-
21
-
22
-
23
-
24
-
25
-
26
-
27
-
28
-
29
-
30
-
31
-
32
-
33
-
34
-
35
-
36
-
 37
37 -
 38
38 -
 39
39 -
 40
40 -
 41
41 -
 42
42 -
 43
43 -
 44
44 -
 45
45 -
 46
46 -
 47
47 -
48
-
49
-
50
-
51
-
52
-
53
-
54
-
55
-
56
-
57
-
58
-
59
-
60
-
61
-
62
-
63
-
64
-
65
-
66
-
67
-
68
-
69
-
70
-
71
-
72
-
73
-
74
-
75
-
76
-
77
-
78
-
79
-
80
-
81
-
82
-
83
-
84
-
85
-
86
-
87
-
88
-
89
-
90
-
91
-
92
-
93
-
94
-
95
-
96
-
97
-
98
-
99
-
100
-
101
-
102
-
103
-
104
-
105
-
106
-
107
-
108
-
109
-
110
-
111
-
112
-
113
-
114
-
115
-
116
-
117
-
118
-
119
-
120
-
121
-
122
-
123
-
124
-
125
-
126
-
127
-
128
-
129
-
130
-
131
-
132
-
133
-
134
-
135
-
136
-
137
-
138
-
139
-
140
-
141
-
142
-
143
-
144
-
145
-
146
-
147
-
148
-
149
-
150
-
151
-
152
-
153
-
154
-
155
-
156
-
157
-
158
-
159
-
160
-
161
-
162
-
163
-
164
-
165
-
166
-
167
-
168
-
169
-
170
-
171
-
172
-
173
-
174
-
175
-
176
-
177
-
178
-
179
-
180
-
181
-
182
-
183
-
184
-
185
-
186
-
187
-
188
-
189
-
190
-
191
-
192
-
193
-
194
-
195
-
196
-
197
-
198
-
199
-
200
-
201
-
202
-
203
-
204
-
205
-
206
-
207
-
208
-
209
-
210
-
211
-
212
-
213
-
214
-
215
-
216
-
217
-
218
-
219
-
220
-
221
-
222
-
223
-
224
-
225
-
226
-
227
-
228
-
229
-
230
-
231
-
232
-
233
-
234
-
235
-
236
-
237
 |
 |
