HP D7560 User Guide - Page 84
Print Quality Report, Sample text area - uneven ink distribution - printhead cleaning
 |
UPC - 883585923687
View all HP D7560 manuals
Add to My Manuals
Save this manual to your list of manuals |
Page 84 highlights
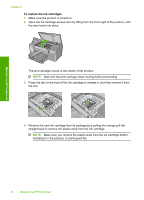
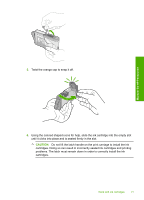
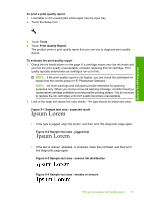
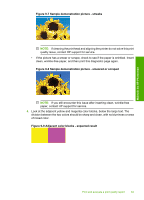
To print a print quality report 1. Load letter or A4 unused plain white paper into the input tray. 2. Touch the Setup icon. Maintain the HP Photosmart 3. Touch Tools. 4. Touch Print Quality Report. The product prints a print quality report that you can use to diagnose print quality issues. To evaluate the print quality report 1. Check the ink levels shown on the page. If a cartridge shows very low ink levels and you find the print quality unacceptable, consider replacing that ink cartridge. Print quality typically deteriorates as cartridges run out of ink. NOTE: If the print quality report is not legible, you can check the estimated ink levels from the control panel or HP Photosmart Software. NOTE: Ink level warnings and indicators provide estimates for planning purposes only. When you receive a low-ink warning message, consider having a replacement cartridge available to avoid possible printing delays. You do not need to replace the ink cartridges until print quality becomes unacceptable. 2. Look at the large text above the color blocks. The type should be sharp and clear. Figure 9-1 Sample text area - expected result • If the type is jagged, align the printer, and then print this diagnostic page again. Figure 9-2 Sample text area - jagged text • If the text is uneven, streaked, or smeared, clean the printhead, and then print this diagnostic page again. Figure 9-3 Sample text area - uneven ink distribution Figure 9-4 Sample text area - streaks or smears Print and evaluate a print quality report 81
-
 1
1 -
2
-
3
-
4
-
5
-
6
-
7
-
8
-
9
-
10
-
11
-
12
-
13
-
14
-
15
-
16
-
17
-
18
-
19
-
20
-
21
-
22
-
23
-
24
-
25
-
26
-
27
-
28
-
29
-
30
-
31
-
32
-
33
-
34
-
35
-
36
-
37
-
38
-
39
-
40
-
41
-
42
-
43
-
44
-
45
-
46
-
47
-
48
-
49
-
50
-
51
-
52
-
53
-
54
-
55
-
56
-
57
-
58
-
59
-
60
-
61
-
62
-
63
-
64
-
65
-
66
-
67
-
68
-
69
-
70
-
71
-
72
-
73
-
74
-
75
-
76
-
77
-
78
-
 79
79 -
 80
80 -
 81
81 -
 82
82 -
 83
83 -
 84
84 -
 85
85 -
 86
86 -
 87
87 -
 88
88 -
 89
89 -
90
-
91
-
92
-
93
-
94
-
95
-
96
-
97
-
98
-
99
-
100
-
101
-
102
-
103
-
104
-
105
-
106
-
107
-
108
-
109
-
110
-
111
-
112
-
113
-
114
-
115
-
116
-
117
-
118
-
119
-
120
-
121
-
122
-
123
-
124
-
125
-
126
-
127
-
128
-
129
-
130
-
131
-
132
-
133
-
134
-
135
-
136
-
137
-
138
-
139
-
140
-
141
-
142
-
143
-
144
-
145
-
146
-
147
-
148
-
149
-
150
-
151
-
152
-
153
-
154
-
155
-
156
-
157
-
158
-
159
-
160
-
161
-
162
-
163
-
164
-
165
-
166
-
167
-
168
-
169
-
170
-
171
-
172
-
173
-
174
-
175
-
176
-
177
-
178
-
179
-
180
-
181
-
182
-
183
-
184
-
185
-
186
-
187
-
188
-
189
-
190
-
191
-
192
-
193
-
194
-
195
-
196
-
197
-
198
-
199
-
200
-
201
-
202
-
203
-
204
-
205
-
206
-
207
-
208
-
209
-
210
-
211
-
212
-
213
-
214
-
215
-
216
-
217
-
218
-
219
-
220
-
221
-
222
-
223
-
224
-
225
-
226
-
227
-
228
-
229
-
230
-
231
-
232
-
233
-
234
-
235
-
236
-
237
 |
 |