HP DesignJet T1530 User guide - Page 20
Turn the printer on and off, The printer’s internal prints, off
 |
View all HP DesignJet T1530 manuals
Add to My Manuals
Save this manual to your list of manuals |
Page 20 highlights
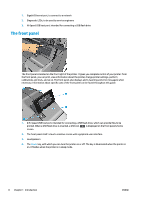
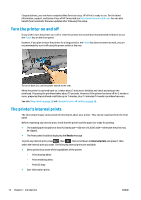
Congratulations, you now have completed Web Services setup. HP ePrint is ready to use. For the latest information, support, and terms of use of HP Connected see http://www.hpconnected.com. You can also benefit from automatic firmware updates after following this setup. Turn the printer on and off If you wish to turn the printer on or off or reset the printer, the normal and recommended method is to use the Power key on the front panel. However, if you plan to store the printer for a long period or the Power key does not seem to work, you are recommended to turn it off using the power switch at the rear. To turn it back on, use the power switch at the rear. When the printer is powered back on, it takes about 3 minutes to initialize and check and prepare the printhead. Preparing the printhead takes about 75 seconds. However, if the printer has been off for 2 weeks or more, preparing the printhead could take up to 7 minutes, plus 13 minutes if it needs a printhead recovery. See also Sleep mode on page 10 and Change the auto-off setting on page 38. The printer's internal prints The internal prints give various kinds of information about your printer. They can be requested from the front panel. Before requesting any internal print, check that the printer and the paper are ready for printing. ● The loaded paper should be at least A3 landscape-420 mm (16.53in) wide-otherwise the print may be clipped. ● The front panel should be displaying the Ready message. To print any internal print, press , then , then scroll down to Internal prints and press it, then select the internal print you want. The following internal prints are available. ● Demo prints show some of the capabilities of the printer ◦ Print drawing demo ◦ Print rendering demo ◦ Print GIS map ● User information prints 12 Chapter 1 Introduction ENWW
-
 1
1 -
2
-
3
-
4
-
5
-
6
-
7
-
8
-
9
-
10
-
11
-
12
-
13
-
14
-
 15
15 -
 16
16 -
 17
17 -
 18
18 -
 19
19 -
 20
20 -
 21
21 -
 22
22 -
 23
23 -
 24
24 -
 25
25 -
26
-
27
-
28
-
29
-
30
-
31
-
32
-
33
-
34
-
35
-
36
-
37
-
38
-
39
-
40
-
41
-
42
-
43
-
44
-
45
-
46
-
47
-
48
-
49
-
50
-
51
-
52
-
53
-
54
-
55
-
56
-
57
-
58
-
59
-
60
-
61
-
62
-
63
-
64
-
65
-
66
-
67
-
68
-
69
-
70
-
71
-
72
-
73
-
74
-
75
-
76
-
77
-
78
-
79
-
80
-
81
-
82
-
83
-
84
-
85
-
86
-
87
-
88
-
89
-
90
-
91
-
92
-
93
-
94
-
95
-
96
-
97
-
98
-
99
-
100
-
101
-
102
-
103
-
104
-
105
-
106
-
107
-
108
-
109
-
110
-
111
-
112
-
113
-
114
-
115
-
116
-
117
-
118
-
119
-
120
-
121
-
122
-
123
-
124
-
125
-
126
-
127
-
128
-
129
-
130
-
131
-
132
-
133
-
134
-
135
-
136
-
137
-
138
-
139
-
140
-
141
-
142
-
143
-
144
-
145
-
146
-
147
-
148
-
149
-
150
-
151
-
152
-
153
-
154
-
155
-
156
-
157
-
158
-
159
-
160
-
161
-
162
-
163
-
164
-
165
-
166
-
167
-
168
-
169
-
170
-
171
-
172
-
173
-
174
-
175
-
176
-
177
-
178
-
179
-
180
-
181
-
182
-
183
-
184
-
185
-
186
-
187
-
188
-
189
-
190
-
191
-
192
-
193
-
194
-
195
-
196
-
197
-
198
 |
 |