HP DesignJet T1530 User guide - Page 36
Introduction, Verify correct operation, Precon network settings if required
 |
View all HP DesignJet T1530 manuals
Add to My Manuals
Save this manual to your list of manuals |
Page 36 highlights
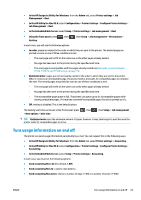
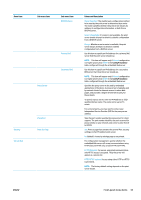
Introduction The printer provides a single RJ-45 connector port for a network connection using an unshielded, twisted-pair network cable. The embedded Jetdirect print server supports connection to IEEE 802.3 10Base-T Ethernet, IEEE 802.3u 100Base-TX Fast Ethernet and 802.3ab 1000Base-T Gigabit Ethernet compliant networks. When connected and powered on, the printer auto-negotiates with your network to operate with a link speed of 10, 100, or 1000 Mbps, and to communicate using full- or half-duplex mode. However, you can manually configure the link using the printer's front panel, or through other configuration tools once network communication is established. The printer can support multiple network protocols simultaneously, including TCP/IPv4 and TCP/IPv6. For security, it includes features to control IP traffic to and from the printer and supports configuration of IP Security (IPsec) protocols. Verify correct operation 1. Print an IO Configuration page to check for status messages. 2. In the upper section of the IO Configuration page, look for the status message I/O Card Ready. 3. If I/O Card Ready appears, the print server is operating properly. Proceed to the next section. If a message other than I/O Card Ready appears, try the following: a. Turn the printer off and then on again to re-initialize the print server. b. Check that the status indicator lights (LEDs) are providing proper status. NOTE: See Troubleshooting on page 29 for link configuration and troubleshooting information. See the HP Jetdirect Print Servers Administrator's Guide for your print server model to interpret and troubleshoot other messages. Preconfigure network settings if required If your network requires that you configure network settings before you add the printer to your network systems, you can do so now. However, in most cases, you can skip this section. Instead, you can proceed directly to the next section to install the printer on your network computer systems. The network installation software will allow you to configure basic network settings and add the printer to your system configuration. Tools for preconfiguration The following tools can be used to preconfigure your network settings. ● The front panel ● The Embedded Web Server ● You can use an advanced configuration method, such as BootP, DHCP, Telnet, or the arp and ping commands. For instructions, see the HP Jetdirect Print Servers Administrator's Guide for your print server model. After the printer is configured with network settings, the configuration values are saved and maintained even after it is turned off and on again. 28 Chapter 4 Network configuration ENWW
-
 1
1 -
2
-
3
-
4
-
5
-
6
-
7
-
8
-
9
-
10
-
11
-
12
-
13
-
14
-
15
-
16
-
17
-
18
-
19
-
20
-
21
-
22
-
23
-
24
-
25
-
26
-
27
-
28
-
29
-
30
-
 31
31 -
 32
32 -
 33
33 -
 34
34 -
 35
35 -
 36
36 -
 37
37 -
 38
38 -
 39
39 -
 40
40 -
 41
41 -
42
-
43
-
44
-
45
-
46
-
47
-
48
-
49
-
50
-
51
-
52
-
53
-
54
-
55
-
56
-
57
-
58
-
59
-
60
-
61
-
62
-
63
-
64
-
65
-
66
-
67
-
68
-
69
-
70
-
71
-
72
-
73
-
74
-
75
-
76
-
77
-
78
-
79
-
80
-
81
-
82
-
83
-
84
-
85
-
86
-
87
-
88
-
89
-
90
-
91
-
92
-
93
-
94
-
95
-
96
-
97
-
98
-
99
-
100
-
101
-
102
-
103
-
104
-
105
-
106
-
107
-
108
-
109
-
110
-
111
-
112
-
113
-
114
-
115
-
116
-
117
-
118
-
119
-
120
-
121
-
122
-
123
-
124
-
125
-
126
-
127
-
128
-
129
-
130
-
131
-
132
-
133
-
134
-
135
-
136
-
137
-
138
-
139
-
140
-
141
-
142
-
143
-
144
-
145
-
146
-
147
-
148
-
149
-
150
-
151
-
152
-
153
-
154
-
155
-
156
-
157
-
158
-
159
-
160
-
161
-
162
-
163
-
164
-
165
-
166
-
167
-
168
-
169
-
170
-
171
-
172
-
173
-
174
-
175
-
176
-
177
-
178
-
179
-
180
-
181
-
182
-
183
-
184
-
185
-
186
-
187
-
188
-
189
-
190
-
191
-
192
-
193
-
194
-
195
-
196
-
197
-
198
 |
 |