HP Integrity Superdome SX1000 SmartSetup Scripting Toolkit Deployment Guide: H - Page 39
Setting Up the Boot Mechanism, Using a Bootable CD or DVD, Creating a Bootable Disk Image
 |
View all HP Integrity Superdome SX1000 manuals
Add to My Manuals
Save this manual to your list of manuals |
Page 39 highlights
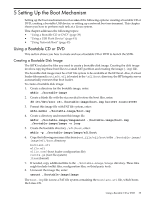
5 Setting Up the Boot Mechanism Setting up the boot mechanism involves one of the following options: creating a bootable CD or DVD, creating a bootable USB device, or setting up a network boot environment. This chapter shows you how to perform each task at a Linux system. This chapter addresses the following topics: • "Using a Bootable CD or DVD" (page 39) • "Using a USB Flash Device" (page 41) • "Using Network Boot" (page 43) Using a Bootable CD or DVD This section shows you how to create and use a bootable CD or DVD to launch the SSTK. Creating a Bootable Disk Image The SSTK includes the files you need to create a bootable disk image. Creating the disk image involves copying these boot files to a small FAT partition and creating the image (.img) file. The bootable disk image must be a FAT file system to be available at the EFI level. Also, if a boot loader file named bootia64.efi is located in the \efi\boot directory, the HP Integrity server automatically executes that boot loader. To create a bootable disk image: 1. Create a directory for the bootable image, enter: mkdir ./bootable-image 2. Create a blank file with the size needed to store the boot files, enter: dd if=/dev/zero of=./bootable-image/boot.img bs=1024 count=25000 3. Format this image file with FAT file system, enter: mkfs.msdos ./bootable-image/boot.img 4. Create a directory and mount this image file. mkdir ./bootable-image/imagemount ./bootable-image/boot.img ./bootable-image/image -o loop 5. Create the bootable directory, /efi/boot, enter: mkdir -p ./bootable-image/image/efi/boot 6. Copy the following necessary files from boot_file/efi/boot to the ./bootable-image/ image/efi/boot directory: bootia64.efi elilo.efi elilo.conf (boot loader configuration file) rootfs.gz (root file system) linux (kernel) 7. If needed, copy additional files to the ./bootable-image/image directory. These files might include toolkit files, configuration files, or third-party tools. 8. Unmount the image file, enter: umount ./bootable-image/image The boot.img file is now a FAT file system containing the bootia64.efi file, which boots the Linux OS. Using a Bootable CD or DVD 39
-
 1
1 -
2
-
3
-
4
-
5
-
6
-
7
-
8
-
9
-
10
-
11
-
12
-
13
-
14
-
15
-
16
-
17
-
18
-
19
-
20
-
21
-
22
-
23
-
24
-
25
-
26
-
27
-
28
-
29
-
30
-
31
-
32
-
33
-
 34
34 -
 35
35 -
 36
36 -
 37
37 -
 38
38 -
 39
39 -
 40
40 -
 41
41 -
 42
42 -
 43
43 -
 44
44 -
45
-
46
-
47
-
48
-
49
-
50
-
51
-
52
-
53
-
54
-
55
-
56
-
57
-
58
-
59
-
60
-
61
-
62
-
63
-
64
-
65
-
66
-
67
-
68
-
69
-
70
-
71
-
72
-
73
-
74
-
75
-
76
-
77
-
78
-
79
-
80
-
81
-
82
-
83
-
84
-
85
 |
 |