HP OMEN Transcend 16 Maintenance and Service Guide - Page 41
Memory modules, Solid-state drives are designed with a notch to prevent incorrect insertion.
 |
View all HP OMEN Transcend 16 manuals
Add to My Manuals
Save this manual to your list of manuals |
Page 41 highlights
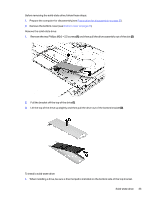
2. Place the bottom bracket onto the drive socket, and then insert the drive into the bracket (1). 3. Insert the drive into the socket (2). 4. Install the top bracket onto the bottom bracket (3), and then install the two screws (4). NOTE: Solid-state drives are designed with a notch to prevent incorrect insertion. Memory modules To remove the memory modules, use this procedure and illustration. Table 5-2 Memory module descriptions and part numbers Description Memory module (DDR5-4800) 16 GB Spare part number M97596-001 34 Chapter 5 Removal and replacement procedures for Customer Self-Repair parts
-
 1
1 -
2
-
3
-
4
-
5
-
6
-
7
-
8
-
9
-
10
-
11
-
12
-
13
-
14
-
15
-
16
-
17
-
18
-
19
-
20
-
21
-
22
-
23
-
24
-
25
-
26
-
27
-
28
-
29
-
30
-
31
-
32
-
33
-
34
-
35
-
 36
36 -
 37
37 -
 38
38 -
 39
39 -
 40
40 -
 41
41 -
 42
42 -
 43
43 -
 44
44 -
 45
45 -
 46
46 -
47
-
48
-
49
-
50
-
51
-
52
-
53
-
54
-
55
-
56
-
57
-
58
-
59
-
60
-
61
-
62
-
63
-
64
-
65
-
66
-
67
-
68
-
69
-
70
-
71
-
72
-
73
-
74
-
75
-
76
-
77
-
78
-
79
-
80
-
81
-
82
-
83
-
84
-
85
-
86
-
87
-
88
-
89
-
90
-
91
-
92
 |
 |

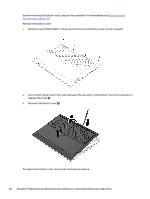
2.
Place the bottom bracket onto the drive socket, and then insert the drive into the bracket
(1)
.
3.
Insert the drive into the socket
(2)
.
4.
Install the top bracket onto the bottom bracket
(3)
, and then install the two screws
(4)
.
NOTE:
Solid-state drives are designed with a notch to prevent incorrect insertion.
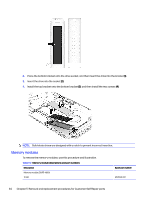
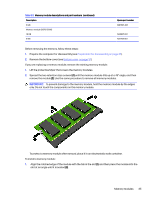
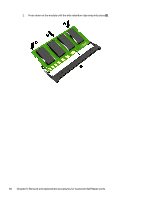
Memory modules
To remove the memory modules, use this procedure and illustration.
Table 5-2
Memory module descriptions and part numbers
Description
Spare part number
Memory module (DDR5-4800)
16 GB
M97596-001
34
Chapter 5
Removal and replacement procedures for Customer Self-Repair parts