HP OMEN Transcend 16 Maintenance and Service Guide - Page 52
double-sided tape., from the touchpad ZIF connector. The cable is secured
 |
View all HP OMEN Transcend 16 manuals
Add to My Manuals
Save this manual to your list of manuals |
Page 52 highlights
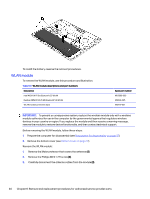
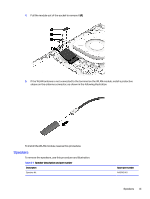
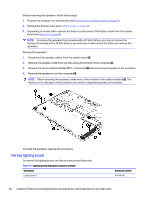
2. Remove the four Phillips M1.6 × 2.0 screws (1) that secure the touchpad bracket to the computer, and then remove the bracket (2). 3. Peel the large Mylar protector off the top of the touchpad (1). 4. Lift the cover off the top of the touchpad to allow access to the screws (2). 5. Disconnect the touchpad cable (3) from the touchpad ZIF connector. The cable is secured with double-sided tape. 6. Remove the three Phillips M1.6 × 2.0 screws (4) that secure the touchpad to the computer. 7. Remove the touchpad from the computer (5). To install the touchpad, reverse this procedure. Touchpad 45
-
 1
1 -
2
-
3
-
4
-
5
-
6
-
7
-
8
-
9
-
10
-
11
-
12
-
13
-
14
-
15
-
16
-
17
-
18
-
19
-
20
-
21
-
22
-
23
-
24
-
25
-
26
-
27
-
28
-
29
-
30
-
31
-
32
-
33
-
34
-
35
-
36
-
37
-
38
-
39
-
40
-
41
-
42
-
43
-
44
-
45
-
46
-
 47
47 -
 48
48 -
 49
49 -
 50
50 -
 51
51 -
 52
52 -
 53
53 -
 54
54 -
 55
55 -
 56
56 -
 57
57 -
58
-
59
-
60
-
61
-
62
-
63
-
64
-
65
-
66
-
67
-
68
-
69
-
70
-
71
-
72
-
73
-
74
-
75
-
76
-
77
-
78
-
79
-
80
-
81
-
82
-
83
-
84
-
85
-
86
-
87
-
88
-
89
-
90
-
91
-
92
 |
 |

2.
Remove the four Phillips M1.6 × 2.0 screws
(1)
that secure the touchpad bracket to the computer, and
then remove the bracket
(2)
.
3.
Peel the large Mylar protector off the top of the touchpad
(1)
.
4.
Lift the cover off the top of the touchpad to allow access to the screws
(2)
.
5.
Disconnect the touchpad cable
(3)
from the touchpad ZIF connector. The cable is secured with
double-sided tape.
6.
Remove the three Phillips M1.6 × 2.0 screws
(4)
that secure the touchpad to the computer.
7.
Remove the touchpad from the computer
(5)
.
To install the touchpad, reverse this procedure.
Touchpad
45