HP OmniBook 900 HP OmniBook 900 - Docking System User Guide - Page 61
Under Create DOS partition or Logical DOS Drive, select 1 Create Primary DOS, Partition and press
 |
View all HP OmniBook 900 manuals
Add to My Manuals
Save this manual to your list of manuals |
Page 61 highlights
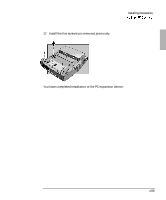
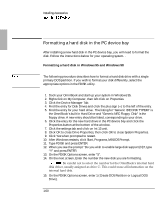
Installing Accessories 16. Under Create DOS partition or Logical DOS Drive, select 1 (Create Primary DOS Partition) and press Enter. 17. At the prompt "Do you wish to use the maximum available size for a primary DOS partition", enter Y. 18. When the partition has been created, Press ESC twice to exit FDISK, then type exit and press ENTER to end the DOS session. 19. Restart the system. 20. Click on My Computer. A drive letter appears for your new drive. Right click on this icon and select Format. 21. When format is complete, repeat steps 2-6 and turn off "Int 13 unit". 22. Select OK to close Drive Properties then select OK to close System Properties. After the system reboots, your new hard drive should be ready to go. Formatting a hard disk drive in Windows NT 1. From the Start menu, Click Programs, Administrative Tools, Disk Administrator. 2. If your new hard disk is not formatted, click on it's name and select Partition, Create from the menu toolbar. A drive letter will be created for the partition. 3. If you want to change the drive letter, select Tools, Assign Drive Letter from the menu toolbar. A pop-up screen allows you to change the drive letter. Click OK when done. 4. Select Partition, Commit Changes Now to save the partition changes, then click Yes in the Confirm dialog box. 5. Click OK in the Disk Administrator dialog box. 6. Select Tools, Format to format the disk drive. Then select the format parameters you want from the pop-up screen and click Start. 7. When formatting is completed, click OK, Close 8. Exit Disk Administrator. 9. See you Windows NT manual for additional information on partitioning disk drives. 1-61
-
 1
1 -
2
-
3
-
4
-
5
-
6
-
7
-
8
-
9
-
10
-
11
-
12
-
13
-
14
-
15
-
16
-
17
-
18
-
19
-
20
-
21
-
22
-
23
-
24
-
25
-
26
-
27
-
28
-
29
-
30
-
31
-
32
-
33
-
34
-
35
-
36
-
37
-
38
-
39
-
40
-
41
-
42
-
43
-
44
-
45
-
46
-
47
-
48
-
49
-
50
-
51
-
52
-
53
-
54
-
55
-
 56
56 -
 57
57 -
 58
58 -
 59
59 -
 60
60 -
 61
61 -
 62
62 -
 63
63 -
 64
64 -
 65
65 -
 66
66 -
67
-
68
-
69
-
70
-
71
-
72
-
73
-
74
-
75
-
76
 |
 |