HP Stitch S1000 User Guide - Page 22
Move the printer, HP Customer Care Centers,
 |
View all HP Stitch S1000 manuals
Add to My Manuals
Save this manual to your list of manuals |
Page 22 highlights
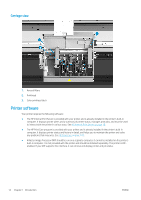
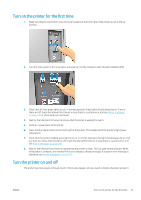
Level Turn off Turn on 1: Major power electronics and engine off. Wait for the Internal Print Server to indicate that the printer is ready, then turn off the high-power subsystems by clicking the shutdown icon near the top left corner of the screen. Wait until the Internal Print Server reports that it has lost its connection to the printer. Click the Wake Up button up in the top left corner of the Internal Print Server window, and wait for the printer to turn on the high-power systems. When prompted, press the blue rearm button at the front right of the printer. NOTE: After the printer electronics have been turned off at the Internal Print Server, the fans turn at maximum speed for safety reasons. This is normal behavior and not a cause for concern. 2: All printer systems off After completing level 1, turn off the main switch. The After completing level 1, turn on the main switch, and (recommended). fans should stop. ensure that the circuit breaker beside it is on. When prompted, press the blue rearm button and wait for the Internal Print Server to announce that the printer is Ready. 3: All printer systems and Internal Print Server off. After completing level 2, shut down the Internal Print Server from the Windows Start button, and wait until you see a black screen with the message No input signal. After completing level 2, see Turn on the printer for the first time on page 15. CAUTION: The computer may be damaged if it is turned off incorrectly. Once the Internal Print Server is completely off and you see No input signal on the screen, turn off the computer power switch. Move the printer If you wish to move the printer a short distance on the same site, across a horizontal floor with no steps and no slopes of more than 3% inclination, see the following instructions. For more difficult movement operations, call your service representative (see HP Customer Care Centers on page 244). CAUTION: Slopes steeper than 3% may cause serious damage to the printer. 1. Turn off the printer. 2. Disconnect all power and network cables from the printer. 3. Raise the feet gradually, applying two turns each time to each foot so that the wheels (A) touch the ground. To raise a foot: a. Use a 24 mm (15/16 in) open end wrench to unlock the nut at the top of the foot. b. Rotate the nut manually down the bolt. Leave about 2 cm (0.8 in) clearance at the bottom between nut and foot. c. Use a 16 mm (5/8 in) open end wrench to rotate the foot upwards. Use the flat hexagonal faces at the bottom of the bolt to fit the wrench. d. Raise the foot as far as the bolt allows. e. Use the 24 mm (15/16 in) open end wrench to lock the nut again. CAUTION: Take care to raise the feet as high as you can. They may break if they touch the ground while the printer is in motion. 16 Chapter 1 Introduction ENWW
-
 1
1 -
2
-
3
-
4
-
5
-
6
-
7
-
8
-
9
-
10
-
11
-
12
-
13
-
14
-
15
-
16
-
 17
17 -
 18
18 -
 19
19 -
 20
20 -
 21
21 -
 22
22 -
 23
23 -
 24
24 -
 25
25 -
 26
26 -
 27
27 -
28
-
29
-
30
-
31
-
32
-
33
-
34
-
35
-
36
-
37
-
38
-
39
-
40
-
41
-
42
-
43
-
44
-
45
-
46
-
47
-
48
-
49
-
50
-
51
-
52
-
53
-
54
-
55
-
56
-
57
-
58
-
59
-
60
-
61
-
62
-
63
-
64
-
65
-
66
-
67
-
68
-
69
-
70
-
71
-
72
-
73
-
74
-
75
-
76
-
77
-
78
-
79
-
80
-
81
-
82
-
83
-
84
-
85
-
86
-
87
-
88
-
89
-
90
-
91
-
92
-
93
-
94
-
95
-
96
-
97
-
98
-
99
-
100
-
101
-
102
-
103
-
104
-
105
-
106
-
107
-
108
-
109
-
110
-
111
-
112
-
113
-
114
-
115
-
116
-
117
-
118
-
119
-
120
-
121
-
122
-
123
-
124
-
125
-
126
-
127
-
128
-
129
-
130
-
131
-
132
-
133
-
134
-
135
-
136
-
137
-
138
-
139
-
140
-
141
-
142
-
143
-
144
-
145
-
146
-
147
-
148
-
149
-
150
-
151
-
152
-
153
-
154
-
155
-
156
-
157
-
158
-
159
-
160
-
161
-
162
-
163
-
164
-
165
-
166
-
167
-
168
-
169
-
170
-
171
-
172
-
173
-
174
-
175
-
176
-
177
-
178
-
179
-
180
-
181
-
182
-
183
-
184
-
185
-
186
-
187
-
188
-
189
-
190
-
191
-
192
-
193
-
194
-
195
-
196
-
197
-
198
-
199
-
200
-
201
-
202
-
203
-
204
-
205
-
206
-
207
-
208
-
209
-
210
-
211
-
212
-
213
-
214
-
215
-
216
-
217
-
218
-
219
-
220
-
221
-
222
-
223
-
224
-
225
-
226
-
227
-
228
-
229
-
230
-
231
-
232
-
233
-
234
-
235
-
236
-
237
-
238
-
239
-
240
-
241
-
242
-
243
-
244
-
245
-
246
-
247
-
248
-
249
-
250
-
251
-
252
-
253
-
254
-
255
-
256
-
257
-
258
-
259
-
260
-
261
-
262
-
263
-
264
-
265
-
266
 |
 |
