HP dc73 Service Reference Guide - HP Compaq dc7800 Business PC - Page 185
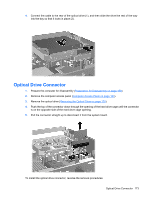
Optical Drive Connector
 |
View all HP dc73 manuals
Add to My Manuals
Save this manual to your list of manuals |
Page 185 highlights
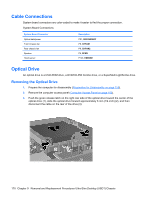
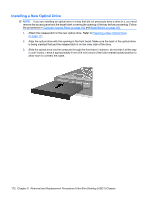
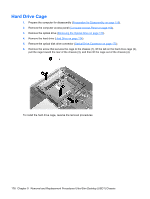
4. Connect the cable to the rear of the optical drive (1), and then slide the drive the rest of the way into the bay so that it locks in place (2). Optical Drive Connector 1. Prepare the computer for disassembly (Preparation for Disassembly on page 159). 2. Remove the computer access panel (Computer Access Panel on page 163). 3. Remove the optical drive (Removing the Optical Drive on page 170). 4. Push the top of the connector down through the opening of the hard drive cage until the connector is on the opposite side of the hard drive cage opening. 5. Pull the connector straight up to disconnect it from the system board. To install the optical drive connector, reverse the removal procedures. Optical Drive Connector 173
-
 1
1 -
2
-
3
-
4
-
5
-
6
-
7
-
8
-
9
-
10
-
11
-
12
-
13
-
14
-
15
-
16
-
17
-
18
-
19
-
20
-
21
-
22
-
23
-
24
-
25
-
26
-
27
-
28
-
29
-
30
-
31
-
32
-
33
-
34
-
35
-
36
-
37
-
38
-
39
-
40
-
41
-
42
-
43
-
44
-
45
-
46
-
47
-
48
-
49
-
50
-
51
-
52
-
53
-
54
-
55
-
56
-
57
-
58
-
59
-
60
-
61
-
62
-
63
-
64
-
65
-
66
-
67
-
68
-
69
-
70
-
71
-
72
-
73
-
74
-
75
-
76
-
77
-
78
-
79
-
80
-
81
-
82
-
83
-
84
-
85
-
86
-
87
-
88
-
89
-
90
-
91
-
92
-
93
-
94
-
95
-
96
-
97
-
98
-
99
-
100
-
101
-
102
-
103
-
104
-
105
-
106
-
107
-
108
-
109
-
110
-
111
-
112
-
113
-
114
-
115
-
116
-
117
-
118
-
119
-
120
-
121
-
122
-
123
-
124
-
125
-
126
-
127
-
128
-
129
-
130
-
131
-
132
-
133
-
134
-
135
-
136
-
137
-
138
-
139
-
140
-
141
-
142
-
143
-
144
-
145
-
146
-
147
-
148
-
149
-
150
-
151
-
152
-
153
-
154
-
155
-
156
-
157
-
158
-
159
-
160
-
161
-
162
-
163
-
164
-
165
-
166
-
167
-
168
-
169
-
170
-
171
-
172
-
173
-
174
-
175
-
176
-
177
-
178
-
179
-
 180
180 -
 181
181 -
 182
182 -
 183
183 -
 184
184 -
 185
185 -
 186
186 -
 187
187 -
 188
188 -
 189
189 -
 190
190 -
191
-
192
-
193
-
194
-
195
-
196
-
197
-
198
-
199
-
200
-
201
-
202
-
203
-
204
-
205
-
206
-
207
-
208
-
209
-
210
-
211
-
212
-
213
-
214
-
215
-
216
-
217
-
218
-
219
-
220
-
221
-
222
-
223
-
224
-
225
-
226
-
227
-
228
-
229
-
230
-
231
-
232
-
233
-
234
-
235
-
236
-
237
-
238
-
239
-
240
-
241
-
242
-
243
-
244
-
245
-
246
-
247
-
248
-
249
-
250
-
251
-
252
-
253
-
254
-
255
-
256
-
257
-
258
-
259
-
260
-
261
-
262
-
263
-
264
-
265
-
266
-
267
-
268
-
269
-
270
-
271
-
272
-
273
-
274
-
275
-
276
 |
 |

4.
Connect the cable to the rear of the optical drive (1), and then slide the drive the rest of the way
into the bay so that it locks in place (2).
Optical Drive Connector
1.
Prepare the computer for disassembly (
Preparation for Disassembly
on page
159
).
2.
Remove the computer access panel (
Computer Access Panel
on page
163
).
3.
Remove the optical drive (
Removing the Optical Drive
on page
170
).
4.
Push the top of the connector down through the opening of the hard drive cage until the connector
is on the opposite side of the hard drive cage opening.
5.
Pull the connector straight up to disconnect it from the system board.
To install the optical drive connector, reverse the removal procedures.
Optical Drive Connector
173