HP dc73 Service Reference Guide - HP Compaq dc7800 Business PC - Page 19
Computer Setup F10 Utilities, Computer Setup-Storage continued
 |
View all HP dc73 manuals
Add to My Manuals
Save this manual to your list of manuals |
Page 19 highlights
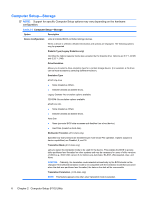
Table 2-3 Computer Setup-Storage (continued) Allows you to specify the parameters (logical cylinders, heads, and sectors per track) used by the BIOS to translate disk I/O requests (from the operating system or an application) into terms the hard drive can accept. Logical cylinders may not exceed 1024. The number of heads may not exceed 256. The number of sectors per track may not exceed 63. These fields are only visible and changeable when the drive translation mode is set to User. SATA Default Values Allows you to specify the default values for the Multisector Transfers, Transfer Mode, and Translation Mode for ATA devices. Storage Options Removable Media Boot Enables/disables ability to boot the system from removable media. Legacy Diskette Write Enables/disables ability to write data to legacy diskettes. NOTE: After saving changes to Removable Media Write, the computer will restart. Turn the computer off, then on, manually. SATA Emulation Allows you to choose how the SATA controller and devices are accessed by the operating system. There are two supported options: IDE and RAID. IDE is the default option. Use this option for "normal" (non-RAID) configurations. Select the RAID option to enable DOS and boot accesses to RAID volumes. Use this option for RAID configurations under Windows 2000, XP, or Vista with the appropriate RAID device driver. NOTE: The RAID device driver must be installed prior to attempting to boot from a RAID volume. If you attempt to boot from a RAID volume without the required device driver installed, the system will crash (blue screen). Also, do not select the RAID option while the DriveLock feature is enabled on any attached hard drives. Doing so will cause the DriveLocked drives to remain locked and inaccessible during subsequent reboots until another SATA Emulation mode is selected. NOTE: SATA Emulation is not available on USDT systems. DPS Self-Test Allows you to execute self-tests on ATA hard drives capable of performing the Drive Protection System (DPS) self-tests. NOTE: This selection will only appear when at least one drive capable of performing the DPS selftests is attached to the system. Boot Order Allows you to: ● Specify the order in which attached devices (such as a USB flash media device, diskette drive, hard drive, optical drive, or network interface card) are checked for a bootable operating system image. Each device on the list may be individually excluded from or included for consideration as a bootable operating system source. ● Specify the order of attached hard drives. The first hard drive in the order will have priority in the boot sequence and will be recognized as drive C (if any devices are attached). NOTE: MS-DOS drive lettering assignments may not apply after a non-MS-DOS operating system has started. Shortcut to Temporarily Override Boot Order To boot one time from a device other than the default device specified in Boot Order, restart the computer and press F9 when the monitor light turns green. After POST is completed, a list of bootable devices is displayed. Use the arrow keys to select the preferred bootable device and press Enter. The computer then boots from the selected non-default device for this one time. Computer Setup (F10) Utilities 7
-
 1
1 -
2
-
3
-
4
-
5
-
6
-
7
-
8
-
9
-
10
-
11
-
12
-
13
-
 14
14 -
 15
15 -
 16
16 -
 17
17 -
 18
18 -
 19
19 -
 20
20 -
 21
21 -
 22
22 -
 23
23 -
 24
24 -
25
-
26
-
27
-
28
-
29
-
30
-
31
-
32
-
33
-
34
-
35
-
36
-
37
-
38
-
39
-
40
-
41
-
42
-
43
-
44
-
45
-
46
-
47
-
48
-
49
-
50
-
51
-
52
-
53
-
54
-
55
-
56
-
57
-
58
-
59
-
60
-
61
-
62
-
63
-
64
-
65
-
66
-
67
-
68
-
69
-
70
-
71
-
72
-
73
-
74
-
75
-
76
-
77
-
78
-
79
-
80
-
81
-
82
-
83
-
84
-
85
-
86
-
87
-
88
-
89
-
90
-
91
-
92
-
93
-
94
-
95
-
96
-
97
-
98
-
99
-
100
-
101
-
102
-
103
-
104
-
105
-
106
-
107
-
108
-
109
-
110
-
111
-
112
-
113
-
114
-
115
-
116
-
117
-
118
-
119
-
120
-
121
-
122
-
123
-
124
-
125
-
126
-
127
-
128
-
129
-
130
-
131
-
132
-
133
-
134
-
135
-
136
-
137
-
138
-
139
-
140
-
141
-
142
-
143
-
144
-
145
-
146
-
147
-
148
-
149
-
150
-
151
-
152
-
153
-
154
-
155
-
156
-
157
-
158
-
159
-
160
-
161
-
162
-
163
-
164
-
165
-
166
-
167
-
168
-
169
-
170
-
171
-
172
-
173
-
174
-
175
-
176
-
177
-
178
-
179
-
180
-
181
-
182
-
183
-
184
-
185
-
186
-
187
-
188
-
189
-
190
-
191
-
192
-
193
-
194
-
195
-
196
-
197
-
198
-
199
-
200
-
201
-
202
-
203
-
204
-
205
-
206
-
207
-
208
-
209
-
210
-
211
-
212
-
213
-
214
-
215
-
216
-
217
-
218
-
219
-
220
-
221
-
222
-
223
-
224
-
225
-
226
-
227
-
228
-
229
-
230
-
231
-
232
-
233
-
234
-
235
-
236
-
237
-
238
-
239
-
240
-
241
-
242
-
243
-
244
-
245
-
246
-
247
-
248
-
249
-
250
-
251
-
252
-
253
-
254
-
255
-
256
-
257
-
258
-
259
-
260
-
261
-
262
-
263
-
264
-
265
-
266
-
267
-
268
-
269
-
270
-
271
-
272
-
273
-
274
-
275
-
276
 |
 |
