HP iPAQ rx4200 HP iPAQ Product Information Guide - Page 15
Step 2: Charge the battery, Step 3: Insert the, CD into the CD drive of your, personal computer
 |
View all HP iPAQ rx4200 manuals
Add to My Manuals
Save this manual to your list of manuals |
Page 15 highlights
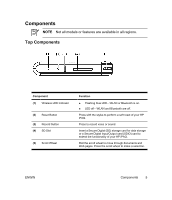
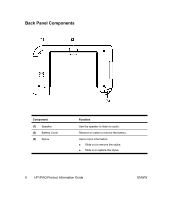
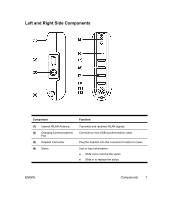
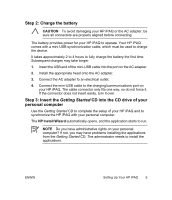
English Step 2: Charge the battery CAUTION To avoid damaging your HP iPAQ or the AC adapter, be sure all connectors are properly aligned before connecting. The battery provides power for your HP iPAQ to operate. Your HP iPAQ comes with a mini-USB synchronization cable, which must be used to charge the device. It takes approximately 2 to 4 hours to fully charge the battery the first time. Subsequent charges may take longer. 1. Insert the USB end of the mini-USB cable into the port on the AC adapter. 2. Install the appropriate head onto the AC adapter. 3. Connect the AC adapter to an electrical outlet. 4. Connect the mini-USB cable to the charging/communications port on your HP iPAQ. The cable connector only fits one way, so do not force it. If the connector does not insert easily, turn it over. Step 3: Insert the Getting Started CD into the CD drive of your personal computer Use the Getting Started CD to complete the setup of your HP iPAQ and to synchronize the HP iPAQ with your personal computer. The HP Install Wizard automatically opens, and the application starts to run. NOTE Do you have administrative rights on your personal computer? If not, you may have problems installing the applications from the Getting Started CD. The administrator needs to install the applications. ENWW Setting Up Your HP iPAQ 9
-
 1
1 -
2
-
3
-
4
-
5
-
6
-
7
-
8
-
9
-
 10
10 -
 11
11 -
 12
12 -
 13
13 -
 14
14 -
 15
15 -
 16
16 -
 17
17 -
 18
18 -
 19
19 -
 20
20 -
21
-
22
-
23
-
24
-
25
-
26
-
27
-
28
-
29
-
30
-
31
-
32
-
33
-
34
-
35
-
36
-
37
-
38
-
39
-
40
-
41
-
42
-
43
-
44
-
45
-
46
-
47
-
48
-
49
-
50
-
51
-
52
-
53
-
54
-
55
-
56
-
57
 |
 |
