IBM 7014-T42 User Guide - Page 15
Leveling the rack, Attaching the stabilizer brackets
 |
View all IBM 7014-T42 manuals
Add to My Manuals
Save this manual to your list of manuals |
Page 15 highlights
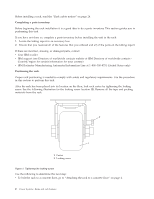
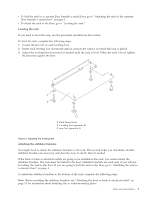
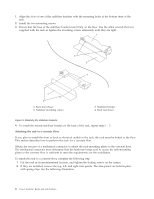
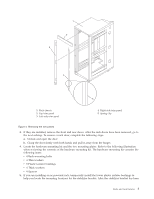
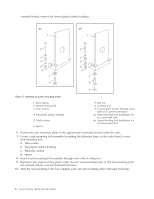
v To bolt the rack to a concrete floor beneath a raised floor, go to "Attaching the rack to the concrete floor beneath a raised floor" on page 9. v To attach the rack to the floor, go to "Leveling the rack." Leveling the rack: If you need to level the rack, use the procedure described in this section. To level the rack, complete the following steps: 1. Loosen the jam nut on each leveling foot. 2. Rotate each leveling foot downward until it contacts the surface on which the rack is placed. 3. Adjust the leveling feet downward as needed until the rack is level. When the rack is level, tighten the jam nuts against the base. 1 Rack Front (base) 2 Leveling Foot (quantity 4) 3 Jam Nut (quantity 4) Figure 2. Adjusting the leveling feet Attaching the stabilizer brackets: You might need to attach the stabilizer brackets to the rack. This section helps you determine whether stabilizer brackets are necessary and describes how to attach them if needed. If the front or back ac electrical outlets are going to be installed in the rack, you cannot attach the stabilizer brackets. The rack must be bolted to the floor. Stabilizer brackets are used only if you will not be bolting the rack to the floor. If you are going to bolt the rack to the floor, go to "Attaching the rack to a concrete floor" on page 4. To attach the stabilizer brackets to the bottom of the rack, complete the following steps: Note: Before installing the stabilizer brackets, see "Attaching the front or back ac electrical outlet" on page 14 for instruction about installing the ac outlet-mounting plates. Racks and rack features 3
-
 1
1 -
2
-
3
-
4
-
5
-
6
-
7
-
8
-
9
-
 10
10 -
 11
11 -
 12
12 -
 13
13 -
 14
14 -
 15
15 -
 16
16 -
 17
17 -
 18
18 -
 19
19 -
 20
20 -
21
-
22
-
23
-
24
-
25
-
26
-
27
-
28
-
29
-
30
-
31
-
32
-
33
-
34
-
35
-
36
-
37
-
38
-
39
-
40
-
41
-
42
-
43
-
44
-
45
-
46
-
47
-
48
-
49
-
50
-
51
-
52
-
53
-
54
-
55
-
56
-
57
-
58
-
59
-
60
-
61
-
62
-
63
-
64
-
65
-
66
-
67
-
68
-
69
-
70
-
71
-
72
-
73
-
74
 |
 |
