IBM 7014-T42 User Guide - Page 56
Secure the long mounting brackets and the blank filler panel - height
 |
View all IBM 7014-T42 manuals
Add to My Manuals
Save this manual to your list of manuals |
Page 56 highlights
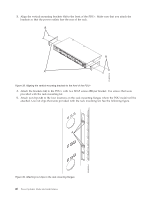
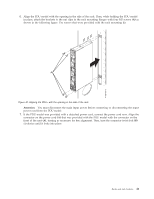
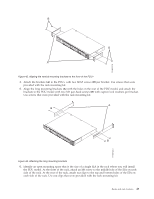
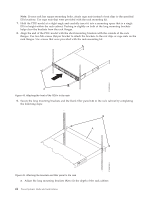
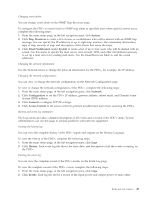
Note: If your rack has square mounting holes, attach cage nuts instead of nut clips to the specified EIA locations. Use cage nuts that were provided with the rack mounting kit. 7. Hold the PDU model at a slight angle and carefully insert it into a mounting space that is a single EIA in height within the rack cabinet. Pushing in slightly on both of the long mounting brackets helps clear the brackets from the rack flanges. 8. Align the end of the PDU model with the short mounting brackets with the outside of the rack flanges. Use two M6 screws (A) per bracket to attach the brackets to the nut clips or cage nuts on the rack flanges. Use screws that were provided with the rack mounting kit. Figure 44. Attaching the front of the PDU+ in the rack 9. Secure the long mounting brackets and the blank filler panel (A) to the rack cabinet by completing the following steps: Figure 45. Attaching the brackets and filler panel to the rack a. Adjust the long mounting brackets (A) to fit the depth of the rack cabinet. 44 Power Systems: Racks and rack features
-
 1
1 -
2
-
3
-
4
-
5
-
6
-
7
-
8
-
9
-
10
-
11
-
12
-
13
-
14
-
15
-
16
-
17
-
18
-
19
-
20
-
21
-
22
-
23
-
24
-
25
-
26
-
27
-
28
-
29
-
30
-
31
-
32
-
33
-
34
-
35
-
36
-
37
-
38
-
39
-
40
-
41
-
42
-
43
-
44
-
45
-
46
-
47
-
48
-
49
-
50
-
 51
51 -
 52
52 -
 53
53 -
 54
54 -
 55
55 -
 56
56 -
 57
57 -
 58
58 -
 59
59 -
 60
60 -
 61
61 -
62
-
63
-
64
-
65
-
66
-
67
-
68
-
69
-
70
-
71
-
72
-
73
-
74
 |
 |
