IBM 7014-T42 User Guide - Page 26
Attaching the front or back ac electrical outlet - top frame
 |
View all IBM 7014-T42 manuals
Add to My Manuals
Save this manual to your list of manuals |
Page 26 highlights
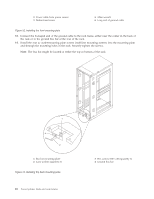
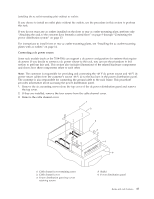
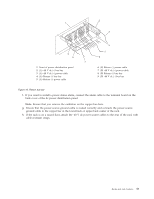
8. Using a multimeter, verify that the voltage at the ac outlet is correct. Attaching the front or back ac electrical outlet: If you need to attach an ac outlet, you can use the procedure in this section to perform this task. Attention: The front and rear ac outlet-mounting plates mount through the same mounting holes in that secure the stabilizer brackets to the rack chassis. Therefore, if the rack must be bolted to the floor, the stabilizer brackets must be removed. Install the ac outlet-mounting plates only after the rack has been bolted to the floor and the stabilizer brackets have been removed. The following items are installed at the customer's site: v The ac outlet-mounting plates for installing customer-supplied ac electrical outlets on the front or rear of the rack. The ac outlet-mounting place provides the mounting location for an ac electrical outlet. v The brass ground lug for an electrostatic discharge (ESD) connection. Note: The customer is responsible for providing both the outlets and the power cables that attach to the power source. The customer is also responsible for connecting the ac outlet correctly. These items are not field-replaceable units (FRUs). Installing the ac outlet-mounting plates with ac outlets: If you choose to install ac mounting plates, you can follow the procedure detailed in this section to perform this task. This section also includes illustrations of the related hardware components and shows how these components relate to each other. If you do not want ac outlets installed on the rack, go to "Installing the ac outlet-mounting plate without ac outlets" on page 17. If you want ac outlets installed on the front or rear ac outlet-mounting plate, complete the following steps: 1. Determine the number of ac outlets that you are installing. 2. Confirm with your contractor that the number and location of ac outlets to be installed are correct. 3. Remove the blank filler plates from the ac outlet-mounting plates for the number of ac outlets being installed. 4. Install the ac outlets on the ac outlet-mounting plate. 5. Install the ground lug in the ac outlet-mounting plate using only one nut, as shown in the following illustration. 6. Securely tighten the one nut on the ground lug. 7. Locate the Y-shaped ground cable supplied with the mounting plate. Note: The remaining steps can be used to install ac outlets on the front or the rear of the rack. 8. Place the star washer onto the ground lug of the front ac outlet-mounting plate. 9. Place the lug on the long end of the ground cable onto the ground lug. 10. Place a ground lug nut onto the ground lug and securely tighten it. 11. Position the front ac outlet-mounting plate onto the rack frame with the ground lug fully inserted through the mounting holes in the rack. 12. Route the cable under the rack. 13. Place the star washer onto the ground lug of the rear ac outlet-mounting plate. 14. Place the lug on the short end of the ground cable onto the ground lug. 14 Power Systems: Racks and rack features
-
 1
1 -
2
-
3
-
4
-
5
-
6
-
7
-
8
-
9
-
10
-
11
-
12
-
13
-
14
-
15
-
16
-
17
-
18
-
19
-
20
-
 21
21 -
 22
22 -
 23
23 -
 24
24 -
 25
25 -
 26
26 -
 27
27 -
 28
28 -
 29
29 -
 30
30 -
 31
31 -
32
-
33
-
34
-
35
-
36
-
37
-
38
-
39
-
40
-
41
-
42
-
43
-
44
-
45
-
46
-
47
-
48
-
49
-
50
-
51
-
52
-
53
-
54
-
55
-
56
-
57
-
58
-
59
-
60
-
61
-
62
-
63
-
64
-
65
-
66
-
67
-
68
-
69
-
70
-
71
-
72
-
73
-
74
 |
 |
