IBM 7014-T42 User Guide - Page 35
Replacing the 7014-T00 or 7014-T42 trim panels
 |
View all IBM 7014-T42 manuals
Add to My Manuals
Save this manual to your list of manuals |
Page 35 highlights
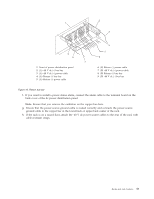
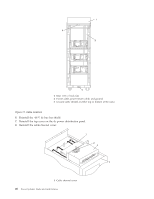
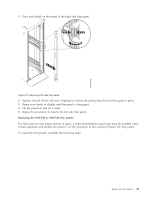
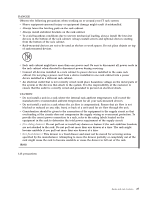
1. Place both hands on the center of the right side trim panel. Figure 21. Removing the rack trim panel 2. Squeeze inward firmly with your fingertips to release the spring clips that hold the panel in place. 3. Rotate your hands in slightly until the panel is disengaged. 4. Lift the panel out and set it aside. 5. Repeat this procedure to remove the left side trim panel. Replacing the 7014-T00 or 7014-T42 trim panels: For racks that use trim panels instead of doors, a reduced-interference panel type must be installed when certain expansion unit models are present. Use the procedure in this section to replace the trim panels. To install the trim panels, complete the following steps: Racks and rack features 23
-
 1
1 -
2
-
3
-
4
-
5
-
6
-
7
-
8
-
9
-
10
-
11
-
12
-
13
-
14
-
15
-
16
-
17
-
18
-
19
-
20
-
21
-
22
-
23
-
24
-
25
-
26
-
27
-
28
-
29
-
 30
30 -
 31
31 -
 32
32 -
 33
33 -
 34
34 -
 35
35 -
 36
36 -
 37
37 -
 38
38 -
 39
39 -
 40
40 -
41
-
42
-
43
-
44
-
45
-
46
-
47
-
48
-
49
-
50
-
51
-
52
-
53
-
54
-
55
-
56
-
57
-
58
-
59
-
60
-
61
-
62
-
63
-
64
-
65
-
66
-
67
-
68
-
69
-
70
-
71
-
72
-
73
-
74
 |
 |
1.
Place both hands on the center of the right side trim panel.
2.
Squeeze inward firmly with your fingertips to release the spring clips that hold the panel in place.
3.
Rotate your hands in slightly until the panel is disengaged.
4.
Lift the panel out and set it aside.
5.
Repeat this procedure to remove the left side trim panel.
Replacing the 7014-T00 or 7014-T42 trim panels:
For racks that use trim panels instead of doors, a reduced-interference panel type must be installed when
certain expansion unit models are present. Use the procedure in this section to replace the trim panels.
To install the trim panels, complete the following steps:
Figure 21. Removing the rack trim panel
Racks and rack features
23