IBM 7014-T42 User Guide - Page 47
Removing and replacing the rack top cover, Removing the rack top cover
 |
View all IBM 7014-T42 manuals
Add to My Manuals
Save this manual to your list of manuals |
Page 47 highlights
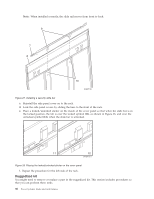
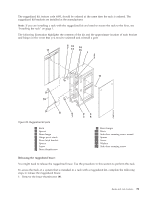
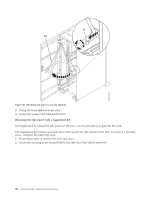
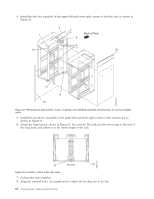
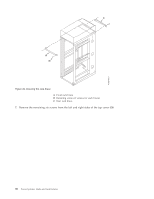
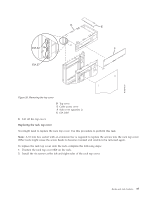
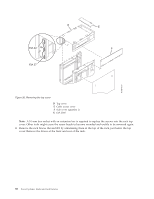
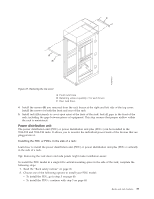
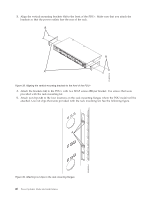
9. Install a screw and washer into all four positions, but do not tighten. 10. After all racks are bolted together, level the racks. 11. Tighten all four screws. 12. Snap on the trim pieces that go between the front and back racks. 13. Snap on the trim piece that goes on top and between the racks. 14. Install rack filler panels to cover the open areas at the front of the racks. All the gaps in the front of the rack must also be sealed, including the gaps between equipment. This step ensures that proper airflow within the rack is maintained. 15. Connect the cables that go between the racks. 16. If you are installing tip plates, go to step 5 in "Installing the rack" on page 1. Removing and replacing the rack top cover You might need to remove or replace the rack top cover. User these procedures to perform these tasks. Removing the rack top cover: You might need to remove the rack top cover. Use this procedure to perform this task. Note: A 10 mm box socket with an extension bar is required to remove the screws from the top cover. Other tools might cause the screw heads to become rounded and unremovable. To remove the rack cover from the rack, complete the following steps: 1. Remove the front door. Note: If the rack is locked, unlock the doors. Then unlock the side panels by removing the locking bars from both sides of the top rear of the rack. Slide the locking bars out from the rack at the top of each side of the rack from the rear. The locking bars can be removed from each side of the front of the rack if the rack space in the locking bars area is open and the bars are easily accessible. 2. Remove the top, left, and right trim panels. 3. Remove the side panels. For more information, see "Removing and replacing 7014-T00 or 7014-T42 side panels" on page 21. 4. Remove one screw from the right side of the top cover and one screw from the left side of the top cover. Do for both front and rear covers. 5. Locate the front (A) and back (C) rack braces that were provided in the shipping container. Fasten each rack brace at the top of the front and rear of the rack, just below the top cover. 6. Use the four screws (B) that were removed from the top cover to secure each rack brace to the rack, as shown in Figure 34 on page 36. Racks and rack features 35
-
 1
1 -
2
-
3
-
4
-
5
-
6
-
7
-
8
-
9
-
10
-
11
-
12
-
13
-
14
-
15
-
16
-
17
-
18
-
19
-
20
-
21
-
22
-
23
-
24
-
25
-
26
-
27
-
28
-
29
-
30
-
31
-
32
-
33
-
34
-
35
-
36
-
37
-
38
-
39
-
40
-
41
-
 42
42 -
 43
43 -
 44
44 -
 45
45 -
 46
46 -
 47
47 -
 48
48 -
 49
49 -
 50
50 -
 51
51 -
 52
52 -
53
-
54
-
55
-
56
-
57
-
58
-
59
-
60
-
61
-
62
-
63
-
64
-
65
-
66
-
67
-
68
-
69
-
70
-
71
-
72
-
73
-
74
 |
 |