IBM 7014-T42 User Guide - Page 58
Using the IBM DPI Configuration Utility, Set IBM DPI Control Group
 |
View all IBM 7014-T42 manuals
Add to My Manuals
Save this manual to your list of manuals |
Page 58 highlights
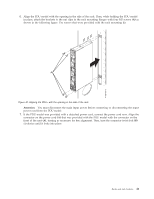
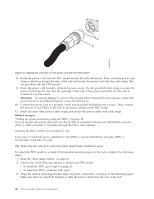
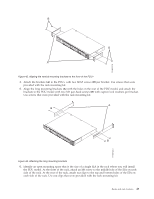
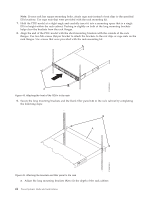
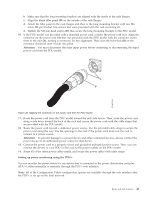
Related tasks: "Installing the PDU or PDU+ in the side of a rack" on page 39 Learn how to install the power distribution unit (PDU) or power distribution unit plus (PDU+) vertically in the side of a rack. Using the IBM DPI Configuration Utility: Learn how to use the IBM Distributed power interconnect (DPI) Configuration Utility to configure the power distribution unit plus (PDU+) settings, such as the IP address, network parameters, access control table, and trap receivers table. Connecting the console: You can configure the PDU+ by using a workstation or notebook computer that is connected to the PDU+. Connect the DB9-to-RJ-45 cable that is shipped with the PDU+ to the RJ-45 console connector on the PDU+, and to a RS-232 serial (COM) connector on a workstation or notebook computer. Using HyperTerminal: HyperTerminal is a terminal program in a Microsoft Windows operating system that enables you to configure or control a device using command line parameters. You can configure the PDU+ parameters and its outlets using numeric commands from a keyboard. You can also use Telnet or any other terminal program to configure the PDU+ after the IP address is set. To start HyperTerminal and communicate with the PDU+, complete the following steps: 1. Click Start > Programs > Accessories > Communications > HyperTerminal. The Connection Description window is displayed. 2. Type the name for the connection in the Name field and select an icon for the connection. 3. Click OK. The Connect To window is displayed. 4. In the Connect using field, select the COM port that is connected to the PDU+. 5. Click OK. The Properties window is displayed. 6. Click Restore Defaults to use the default settings. Make sure that the Bits per second field is 9600 and that the Flow control field is None. 7. Click OK. 8. Press any key. The Configuration Utility main menu is displayed. 9. Type the default password, passw0rd (all lowercase letters with a zero, not O), and press Enter. 10. Enter the menu option that you want. For descriptions of the options, see "Configuration Utility menu options." Configuration Utility menu options: The following options are shown on the Configuration Utility main menu: IBM DPI Settings When you select IBM DPI Settings, the IBM DPI Configuration Utility window is displayed with the following options: Set the IP Address, Gateway Address and MIB System Group View and change the IP address, date, time, and MIB system information. Set IBM DPI Control Group Set the administrator user name, password, and access protocols. Set Write Access Managers Set up a list of users who can access and control the PDU+. Set Trap Receivers Configure remote network management system (NMS) servers to receive traps. 46 Power Systems: Racks and rack features
-
 1
1 -
2
-
3
-
4
-
5
-
6
-
7
-
8
-
9
-
10
-
11
-
12
-
13
-
14
-
15
-
16
-
17
-
18
-
19
-
20
-
21
-
22
-
23
-
24
-
25
-
26
-
27
-
28
-
29
-
30
-
31
-
32
-
33
-
34
-
35
-
36
-
37
-
38
-
39
-
40
-
41
-
42
-
43
-
44
-
45
-
46
-
47
-
48
-
49
-
50
-
51
-
52
-
 53
53 -
 54
54 -
 55
55 -
 56
56 -
 57
57 -
 58
58 -
 59
59 -
 60
60 -
 61
61 -
 62
62 -
 63
63 -
64
-
65
-
66
-
67
-
68
-
69
-
70
-
71
-
72
-
73
-
74
 |
 |
