IBM 7014-T42 User Guide - Page 16
Attaching the rack to a concrete floor - power supply
 |
View all IBM 7014-T42 manuals
Add to My Manuals
Save this manual to your list of manuals |
Page 16 highlights
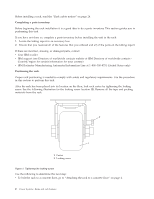
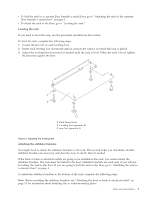
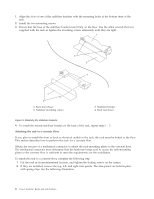
1. Align the slots of one of the stabilizer brackets with the mounting holes at the bottom front of the rack. 2. Install the two mounting screws. 3. Ensure that the base of the stabilizer bracket rests firmly on the floor. Use the Allen wrench that was supplied with the rack to tighten the mounting screws alternately until they are tight. 1 Rack front (base) 2 Stabilizer mounting screws 3 Stabilizer bracket 4 Rack rear (base) Figure 3. Attaching the stabilizer brackets 4. To install the second stabilizer bracket on the back of the rack, repeat steps 1 - 3. Attaching the rack to a concrete floor: If you plan to install the front or back ac electrical outlets in the rack, the rack must be bolted to the floor. This section describes how to perform this task for a concrete floor. Obtain the services of a mechanical contractor to attach the rack-mounting plates to the concrete floor. The mechanical contractor must determine that the hardware being used to secure the rack-mounting plates to the concrete floor is sufficient to meet the requirements for the installation. To attach the rack to a concrete floor, complete the following step: 1. Put the rack in its predetermined location, and tighten the locking screws on the casters. 2. If they are installed, remove the top, left, and right trim panels. The trim panels are held in place with spring clips. See the following illustration. 4 Power Systems: Racks and rack features
-
 1
1 -
2
-
3
-
4
-
5
-
6
-
7
-
8
-
9
-
10
-
 11
11 -
 12
12 -
 13
13 -
 14
14 -
 15
15 -
 16
16 -
 17
17 -
 18
18 -
 19
19 -
 20
20 -
 21
21 -
22
-
23
-
24
-
25
-
26
-
27
-
28
-
29
-
30
-
31
-
32
-
33
-
34
-
35
-
36
-
37
-
38
-
39
-
40
-
41
-
42
-
43
-
44
-
45
-
46
-
47
-
48
-
49
-
50
-
51
-
52
-
53
-
54
-
55
-
56
-
57
-
58
-
59
-
60
-
61
-
62
-
63
-
64
-
65
-
66
-
67
-
68
-
69
-
70
-
71
-
72
-
73
-
74
 |
 |
