IBM 7014-T42 User Guide - Page 52
per bracket. Use screws that were, Attach nut clips - pdu
 |
View all IBM 7014-T42 manuals
Add to My Manuals
Save this manual to your list of manuals |
Page 52 highlights
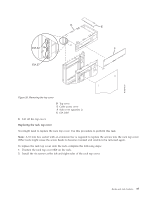
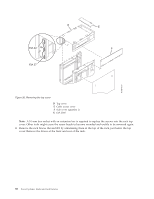
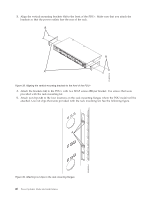
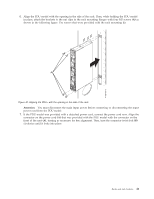
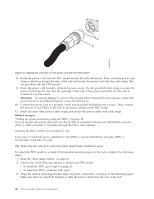
3. Align the vertical-mounting brackets (A) to the front of the PDU+. Make sure that you attach the brackets so that the power outlets face the rear of the rack. Figure 38. Aligning the vertical-mounting brackets to the front of the PDU+ 4. Attach the brackets (A) to the PDU+ with two M3x5 screws (B) per bracket. Use screws that were provided with the rack mounting kit. 5. Attach nut clips (A) to the four locations on the rack mounting flanges where the PDU model will be attached. Use nut clips that were provided with the rack mounting kit. See the following figure. Figure 39. Attaching nut clips to the rack mounting flanges 40 Power Systems: Racks and rack features
-
 1
1 -
2
-
3
-
4
-
5
-
6
-
7
-
8
-
9
-
10
-
11
-
12
-
13
-
14
-
15
-
16
-
17
-
18
-
19
-
20
-
21
-
22
-
23
-
24
-
25
-
26
-
27
-
28
-
29
-
30
-
31
-
32
-
33
-
34
-
35
-
36
-
37
-
38
-
39
-
40
-
41
-
42
-
43
-
44
-
45
-
46
-
 47
47 -
 48
48 -
 49
49 -
 50
50 -
 51
51 -
 52
52 -
 53
53 -
 54
54 -
 55
55 -
 56
56 -
 57
57 -
58
-
59
-
60
-
61
-
62
-
63
-
64
-
65
-
66
-
67
-
68
-
69
-
70
-
71
-
72
-
73
-
74
 |
 |

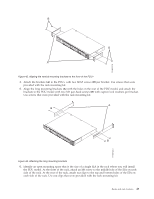
3.
Align the vertical-mounting brackets
(A)
to the front of the PDU+. Make sure that you attach the
brackets so that the power outlets face the rear of the rack.
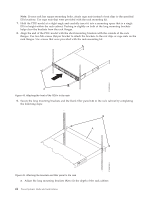
4.
Attach the brackets
(A)
to the PDU+ with two M3x5 screws
(B)
per bracket. Use screws that were
provided with the rack mounting kit.
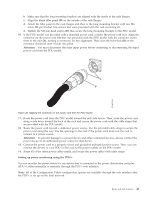
5.
Attach nut clips
(A)
to the four locations on the rack mounting flanges where the PDU model will be
attached. Use nut clips that were provided with the rack mounting kit. See the following figure.
Figure 38. Aligning the vertical-mounting brackets to the front of the PDU+
Figure 39. Attaching nut clips to the rack mounting flanges
40
Power Systems: Racks and rack features