IBM JS20 User Guide - Page 44
Statement, CAUTION, Hazardous, energy, present, blade, server, connected, power, source., Always,
 |
UPC - 000435230263
View all IBM JS20 manuals
Add to My Manuals
Save this manual to your list of manuals |
Page 44 highlights
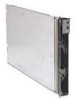
Statement 21: CAUTION: Hazardous energy is present when the blade server is connected to the power source. Always replace the blade cover before installing the blade server. Complete the following steps to install a blade server into the BladeCenter unit: 1. Read the safety information beginning on page v and "Installation guidelines" on page 19. 2. If you have not done so already, install any options needed, such as disk drives or memory, in the blade server. Note: Some of the JS20 Type 8842 blade server options are unique and are not compatible with the options that are installed in other IBM blade server types. Make sure that all of the options that you are installing are designed for use with the JS20 Type 8842 blade server. For a list of supported options for the blade server, see http://www.ibm.com/servers/ eserver/serverproven/compat/us. 3. Select the bay for the blade server. 4. If the bay that you selected contains a filler blade, remove the filler blade. For future use, store the filler blade in a static-protective environment. 5. Make sure that the release levers on the blade server are in the open position (perpendicular to the blade server). 6. Slide the blade server into the bay until it stops. The spring-loaded doors further back in the bay that cover the bay opening move out of the way as you insert the blade server. 7. Push the release levers on the front of the blade server to the closed position. 8. (Optional) A set of blank labels comes with the blade server. When you install the blade server in the BladeCenter unit, write identifying information on a label and place the label on the BladeCenter unit bezel. See the documentation for your BladeCenter unit for recommended label placement. Important: a. If you install a blade server in bay 14, place the label next to the product name. Do not cover the label that contains the system information. b. Do not place the label on the blade server or in any way block the ventilation holes on the blade server. 32 BladeCenter JS20 Type 8842: Installation and User's Guide
-
 1
1 -
2
-
3
-
4
-
5
-
6
-
7
-
8
-
9
-
10
-
11
-
12
-
13
-
14
-
15
-
16
-
17
-
18
-
19
-
20
-
21
-
22
-
23
-
24
-
25
-
26
-
27
-
28
-
29
-
30
-
31
-
32
-
33
-
34
-
35
-
36
-
37
-
38
-
 39
39 -
 40
40 -
 41
41 -
 42
42 -
 43
43 -
 44
44 -
 45
45 -
 46
46 -
 47
47 -
 48
48 -
 49
49 -
50
-
51
-
52
-
53
-
54
-
55
-
56
-
57
-
58
-
59
-
60
-
61
-
62
-
63
-
64
-
65
-
66
-
67
-
68
-
69
-
70
-
71
-
72
-
73
-
74
-
75
-
76
-
77
-
78
-
79
-
80
-
81
-
82
-
83
-
84
-
85
-
86
-
87
-
88
-
89
-
90
-
91
-
92
-
93
-
94
-
95
-
96
-
97
-
98
-
99
-
100
-
101
-
102
-
103
-
104
-
105
-
106
-
107
-
108
-
109
-
110
-
111
-
112
-
113
-
114
-
115
-
116
-
117
-
118
-
119
-
120
-
121
-
122
-
123
-
124
-
125
-
126
-
127
-
128
-
129
-
130
-
131
-
132
 |
 |
