IBM x3500 User Guide - Page 43
peripheral
 |
UPC - 883436005760
View all IBM x3500 manuals
Add to My Manuals
Save this manual to your list of manuals |
Page 43 highlights
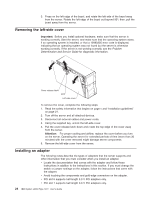
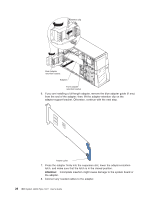
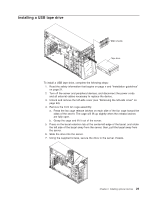
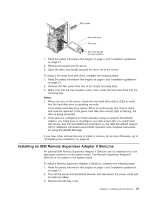
Installing a USB tape drive EMC shields Tape drive To install a USB tape drive, complete the following steps: 1. Read the safety information that begins on page v and "Installation guidelines" on page 21. 2. Turn off the server and peripheral devices, and disconnect the power cords and all external cables necessary to replace the device. 3. Unlock and remove the left-side cover (see "Removing the left-side cover" on page 24). 4. Remove the front fan cage assembly: a. Press the fan cage release latches on each side of the fan cage toward the sides of the server. The cage will lift up slightly when the release latches are fully open. b. Grasp the cage and lift it out of the server. 5. Press on the bezel retention tab at the center-left-edge of the bezel, and rotate the left side of the bezel away from the server; then, pull the bezel away from the server. 6. Slide the drive into the server. 7. Using the supplied screws, secure the drive to the server chassis. Chapter 2. Installing optional devices 29
-
 1
1 -
2
-
3
-
4
-
5
-
6
-
7
-
8
-
9
-
10
-
11
-
12
-
13
-
14
-
15
-
16
-
17
-
18
-
19
-
20
-
21
-
22
-
23
-
24
-
25
-
26
-
27
-
28
-
29
-
30
-
31
-
32
-
33
-
34
-
35
-
36
-
37
-
 38
38 -
 39
39 -
 40
40 -
 41
41 -
 42
42 -
 43
43 -
 44
44 -
 45
45 -
 46
46 -
 47
47 -
 48
48 -
49
-
50
-
51
-
52
-
53
-
54
-
55
-
56
-
57
-
58
-
59
-
60
-
61
-
62
-
63
-
64
-
65
-
66
-
67
-
68
-
69
-
70
-
71
-
72
-
73
-
74
-
75
-
76
-
77
-
78
-
79
-
80
-
81
-
82
-
83
-
84
-
85
-
86
-
87
-
88
-
89
-
90
-
91
-
92
-
93
-
94
-
95
-
96
-
97
-
98
-
99
-
100
-
101
-
102
-
103
-
104
 |
 |
