IBM x3500 User Guide - Page 53
Installing, microprocessor
 |
UPC - 883436005760
View all IBM x3500 manuals
Add to My Manuals
Save this manual to your list of manuals |
Page 53 highlights
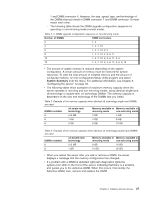
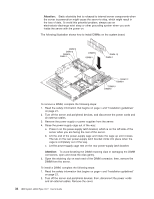
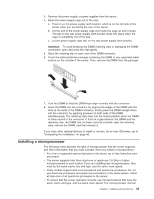
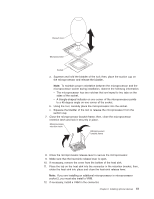
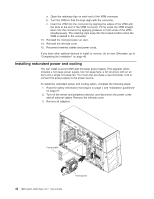
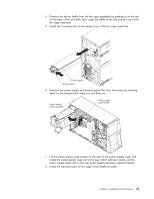
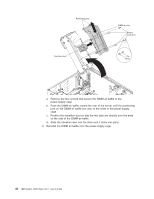
3. Remove the power supply or power supplies from the server. 4. Raise the power-supply cage out of the way: a. Press in on the power-supply latch bracket, which is on the left side of the server when you are facing the rear of the server. b. Lift the end of the power-supply cage and rotate the cage up until it stops. The tab on the rear power-supply latch bracket clicks into place when the cage is completely out of the way. c. Let the power-supply cage rest on the rear power-supply latch bracket. Attention: To avoid breaking the DIMM retaining clips or damaging the DIMM connectors, open and close the clips gently. 5. Open the retaining clip on each end of the DIMM connector. 6. Touch the static-protective package containing the DIMM to any unpainted metal surface on the outside of the server. Then, remove the DIMM from the package. 7. Turn the DIMM so that the DIMM keys align correctly with the connector. 8. Insert the DIMM into the connector by aligning the edges of the DIMM with the slots at the ends of the DIMM connector. Firmly press the DIMM straight down into the connector by applying pressure on both ends of the DIMM simultaneously. The retaining clips snap into the locked position when the DIMM is firmly seated in the connector. If there is a gap between the DIMM and the retaining clips, the DIMM has not been correctly inserted; open the retaining clips, remove the DIMM, and then reinsert it. If you have other optional devices to install or remove, do so now. Otherwise, go to "Completing the installation" on page 46. Installing a microprocessor The following notes describe the type of microprocessor that the server supports and other information that you must consider when you install a microprocessor: v For a list of supported optional devices for the server, go to http://www.ibm.com/ us/compat/. v The server supports Intel Xeon dual-core or quad-core 1.6 GHz or higher microprocessors in each socket. If you are installing two microprocessors, they must be the same cache size and type, and the same clock speed. v Some models support dual-core processors and quad-core processors. Do not use dual-core processors and quad-core processors in the same system. Install all dual-core or all quad-core processors in the server. v To ensure that the server operates correctly, use microprocessors that have the same cache and type, and the same clock speed. The microprocessor internal Chapter 2. Installing optional devices 39
-
 1
1 -
2
-
3
-
4
-
5
-
6
-
7
-
8
-
9
-
10
-
11
-
12
-
13
-
14
-
15
-
16
-
17
-
18
-
19
-
20
-
21
-
22
-
23
-
24
-
25
-
26
-
27
-
28
-
29
-
30
-
31
-
32
-
33
-
34
-
35
-
36
-
37
-
38
-
39
-
40
-
41
-
42
-
43
-
44
-
45
-
46
-
47
-
 48
48 -
 49
49 -
 50
50 -
 51
51 -
 52
52 -
 53
53 -
 54
54 -
 55
55 -
 56
56 -
 57
57 -
 58
58 -
59
-
60
-
61
-
62
-
63
-
64
-
65
-
66
-
67
-
68
-
69
-
70
-
71
-
72
-
73
-
74
-
75
-
76
-
77
-
78
-
79
-
80
-
81
-
82
-
83
-
84
-
85
-
86
-
87
-
88
-
89
-
90
-
91
-
92
-
93
-
94
-
95
-
96
-
97
-
98
-
99
-
100
-
101
-
102
-
103
-
104
 |
 |
