IBM x3500 User Guide - Page 58
positioning
 |
UPC - 883436005760
View all IBM x3500 manuals
Add to My Manuals
Save this manual to your list of manuals |
Page 58 highlights
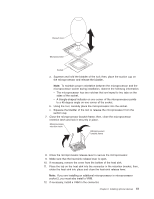
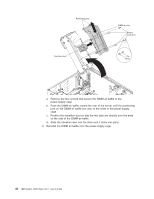
Positioning pins Transition duct DIMM air duct Plastic push pins Pin Rivet a. Remove the four screws that secure the DIMM air baffle to the power-supply cage. b. Push the DIMM air baffle toward the rear of the server until the positioning pins on the DIMM air baffle are clear of the holes in the power-supply cage. c. Position the transition duct so that the two tabs are directly over the slots on the side of the DIMM air baffle. d. Slide the transition duct into the slots until it clicks into place. 9. Reinstall the DIMM air baffle onto the power-supply cage. 44 IBM System x3500 Type 7977: User's Guide
-
 1
1 -
2
-
3
-
4
-
5
-
6
-
7
-
8
-
9
-
10
-
11
-
12
-
13
-
14
-
15
-
16
-
17
-
18
-
19
-
20
-
21
-
22
-
23
-
24
-
25
-
26
-
27
-
28
-
29
-
30
-
31
-
32
-
33
-
34
-
35
-
36
-
37
-
38
-
39
-
40
-
41
-
42
-
43
-
44
-
45
-
46
-
47
-
48
-
49
-
50
-
51
-
52
-
 53
53 -
 54
54 -
 55
55 -
 56
56 -
 57
57 -
 58
58 -
 59
59 -
 60
60 -
 61
61 -
 62
62 -
 63
63 -
64
-
65
-
66
-
67
-
68
-
69
-
70
-
71
-
72
-
73
-
74
-
75
-
76
-
77
-
78
-
79
-
80
-
81
-
82
-
83
-
84
-
85
-
86
-
87
-
88
-
89
-
90
-
91
-
92
-
93
-
94
-
95
-
96
-
97
-
98
-
99
-
100
-
101
-
102
-
103
-
104
 |
 |

Transition duct
DIMM air duct
Plastic
push pins
Positioning pins
Rivet
Pin
a.
Remove
the
four
screws
that
secure
the
DIMM
air
baffle
to
the
power-supply
cage.
b.
Push
the
DIMM
air
baffle
toward
the
rear
of
the
server
until
the
positioning
pins
on
the
DIMM
air
baffle
are
clear
of
the
holes
in
the
power-supply
cage.
c.
Position
the
transition
duct
so
that
the
two
tabs
are
directly
over
the
slots
on
the
side
of
the
DIMM
air
baffle.
d.
Slide
the
transition
duct
into
the
slots
until
it
clicks
into
place.
9.
Reinstall
the
DIMM
air
baffle
onto
the
power-supply
cage.
44
IBM
System
x3500
Type
7977:
User’s
Guide