IBM x3500 User Guide - Page 56
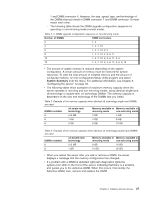
Installing, redundant, power, cooling - watts
 |
UPC - 883436005760
View all IBM x3500 manuals
Add to My Manuals
Save this manual to your list of manuals |
Page 56 highlights
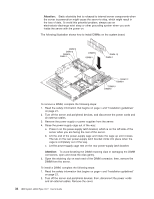
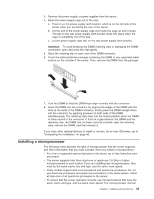
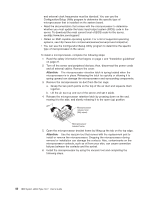
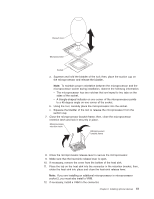
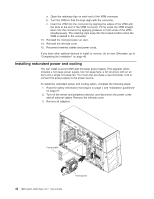
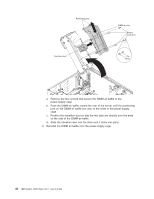
a. Open the retaining clips on each end of the VRM connector. b. Turn the VRM so that the keys align with the connector. c. Insert the VRM into the connector by aligning the edges of the VRM with the slots at the end of the VRM connector. Firmly press the VRM straight down into the connector by applying pressure on both ends of the VRM simultaneously. The retaining clips snap into the locked position when the VRM is seated in the connector. 13. Reinstall the microprocessor air duct. 14. Reinstall the left-side cover. 15. Reconnect external cables and power cords. If you have other optional devices to install or remove, do so now. Otherwise, go to "Completing the installation" on page 46. Installing redundant power and cooling You can install a second 835-watt hot-swap power-supply. This upgrade option includes a hot-swap power supply, two hot-swap fans, a fan structure with an air duct and a single hot-swap fan. You must also purchase a second power cord to connect the power-supply to the power source. To install the redundant power and cooling option, complete the following steps: 1. Read the safety information that begins on page v and "Installation guidelines" on page 21. 2. Turn off the server and peripheral devices, and disconnect the power cords and all external cables. Remove the left-side cover. 3. Remove all adapters. Fan air baffle 42 IBM System x3500 Type 7977: User's Guide Hot-swap fan
-
 1
1 -
2
-
3
-
4
-
5
-
6
-
7
-
8
-
9
-
10
-
11
-
12
-
13
-
14
-
15
-
16
-
17
-
18
-
19
-
20
-
21
-
22
-
23
-
24
-
25
-
26
-
27
-
28
-
29
-
30
-
31
-
32
-
33
-
34
-
35
-
36
-
37
-
38
-
39
-
40
-
41
-
42
-
43
-
44
-
45
-
46
-
47
-
48
-
49
-
50
-
 51
51 -
 52
52 -
 53
53 -
 54
54 -
 55
55 -
 56
56 -
 57
57 -
 58
58 -
 59
59 -
 60
60 -
 61
61 -
62
-
63
-
64
-
65
-
66
-
67
-
68
-
69
-
70
-
71
-
72
-
73
-
74
-
75
-
76
-
77
-
78
-
79
-
80
-
81
-
82
-
83
-
84
-
85
-
86
-
87
-
88
-
89
-
90
-
91
-
92
-
93
-
94
-
95
-
96
-
97
-
98
-
99
-
100
-
101
-
102
-
103
-
104
 |
 |
