JVC GR-DVM70U Instruction Manual - Page 22
Basic Recording For Video cont.
 |
UPC - 046838157424
View all JVC GR-DVM70U manuals
Add to My Manuals
Save this manual to your list of manuals |
Page 22 highlights
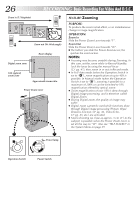
22 EN RECORDING Basic Recording For Video (cont.) Shooting While Watching The LCD Monitor Before the following steps, perform step 1 (੬ pg. 20). 2 ENTER RECORD-STANDBY MODE Make sure the viewfinder is pushed back in. Set the Operation Switch to " " or " ". Then, set the Power Switch to " " while pressing down the Lock Button. Open the LCD monitor fully. •The lens cover opens, the power lamp lights and the camcorder enters the Record-Standby mode. •The scene you are aimed at appears in the LCD monitor, with the word "PAUSE" superimposed upon it. Operation Switch 3 START SHOOTING Tilt the LCD monitor upward/downward for best viewability (੬ pg. 23) and press START/STOP. A M •" " appears in the LCD monitor while recording is in progress. 4 STOP RECORDING Press START/STOP again to stop recording. START/STOP Button Lock Button Power Switch /PCOFF CAME Power lamp •The camcorder re-enters the Record-Standby mode. NOTES: ● When you use the LCD monitor outdoors in direct sunlight, the LCD monitor may be difficult to see. If this happens, we recommend that you use the viewfinder (੬ pg. 20). ● To turn the tally lamp off during recording, refer to pgs. 36 - 39. ● For other notes, refer to pg. 21. PLAY RA5S DSC DS C PLAY Tally lamp (lights while recording is in progress)
-
 1
1 -
2
-
3
-
4
-
5
-
6
-
7
-
8
-
9
-
10
-
11
-
12
-
13
-
14
-
15
-
16
-
 17
17 -
 18
18 -
 19
19 -
 20
20 -
 21
21 -
 22
22 -
 23
23 -
 24
24 -
 25
25 -
 26
26 -
 27
27 -
28
-
29
-
30
-
31
-
32
-
33
-
34
-
35
-
36
-
37
-
38
-
39
-
40
-
41
-
42
-
43
-
44
-
45
-
46
-
47
-
48
-
49
-
50
-
51
-
52
-
53
-
54
-
55
-
56
-
57
-
58
-
59
-
60
-
61
-
62
-
63
-
64
-
65
-
66
-
67
-
68
-
69
-
70
-
71
-
72
-
73
-
74
-
75
-
76
-
77
-
78
-
79
-
80
-
81
-
82
-
83
-
84
-
85
-
86
-
87
-
88
-
89
-
90
-
91
-
92
-
93
-
94
-
95
-
96
-
97
-
98
-
99
-
100
-
101
-
102
-
103
-
104
-
105
-
106
-
107
-
108
-
109
-
110
-
111
-
112
 |
 |
